Automating AWS Lambda Deployment with Container Images using CodePipeline and CodeBuild
This article walks you through automating the packaging and deployment of Lambda code in a Docker container using AWS CodePipeline and AWS CodeBuild, with the source code stored in a private GitHub repository.
Deploying AWS Lambda functions as container images simplifies dependency management and environment consistency. Instead of managing dependencies in zip files, you can use Docker containers, offering more flexibility, especially when dealing with larger libraries or custom binaries.
This article walks you through automating the packaging and deployment of Lambda code in a Docker container using AWS CodePipeline and AWS CodeBuild, with the source code stored in a private GitHub repository. We'll use Python code, but any other language can be used if you can package your application in a container image.
Using Lambda with Container Images provides the following advantages:
- Flexibility in Libraries: No size constraints when using external dependencies (Lambda supports a maximum uncompressed image size of 10 GB, including all layers).
- Custom Runtimes: You can define your own runtime and environment.
- Consistency: Containers ensure the environment is identical between local development and production.
More info on Lambda container images: https://docs.aws.amazon.com/lambda/latest/dg/images-create.html
Pairing these characteristics with the build and deployment automation capabilities of CodeBuild and CodePipeline offers a perfect combination.
The Pipeline
We'll implement the following setup:
- Use CodePipeline to trigger a build process on every commit automatically.
- Use CodeBuild to package the Lambda code into a Docker container image.
- Push the Docker image to Amazon ECR (Elastic Container Registry).
- Update (or Create) the Lambda function with the new image.
How to follow this tutorial
I have created a public GitHub repository that will serve as the boilerplate of a new repository (that you will own) containing both the code to deploy the AWS infrastructure we need and the code to be packaged inside the container executed by Lambda. Follow the instructions in the README.md file to create your own copy of the repository, and/or read the Step-by-Step Setup Guide section below.
I'll first explain the purpose of each file (some of them will not exist initially, as we'll be using the envsubst command to create them from template files). Then, I'll review their contents (actually, the contents of the template files, but that's not important). Finally, I'll provide the details for deploying the pipeline and testing the deployed Lambda function.
NOTE: You can skip the File and Folder Description and File Contents sections and jump directly into the Step-by-Step Setup Guide section. If you are interested in the nitty-gritty details, you can review the skipped sections later.
You will need access to an AWS account with the required permissions to create/modify/delete resources. You will interact mainly with the AWS CLI, except for some steps that can only be performed on the Management Account. The envsubst and jq commands need to be installed on your machine.

File and Folder Descriptions
This tutorial will use the following files:
/containerlambdacicd/
│
├── requirements.txt
├── Dockerfile
├── buildspec.yml
├── project-config.json
├── pipeline.json
├── create-roles.sh
├── src/
│   ├── my_libs/
│   │   ├── helper_module.py
│   │   └── another_helper_module.py
│   └── main.py
└── scripts/
    └── create_or_update_lambda_function.sh
The purpose of each file is explained below:
requirements.txt
- Purpose: Contains a list of Python dependencies required for the Lambda function. This file is referenced in the Dockerfile for installing necessary packages during the container build phase.
Dockerfile
- Purpose: Defines how the Docker container for the Lambda function is built. CodeBuild uses this file to create the container image that will be deployed to AWS Lambda.
buildspec.yml
- Purpose: Contains build instructions for AWS CodeBuild to build, tag, push the Docker image to Amazon ECR, and update (or create) the Lambda function.
project-config.json
- Purpose: This file defines the configuration for an AWS CodeBuild project named
MyLambdaBuildProject. This file is used to create or configure the CodeBuild project referenced inside the CodePipeline pipeline.
pipeline.json
- Purpose: Defines the AWS CodePipeline configuration for the CI/CD pipeline. This JSON file is used to create the CodePipeline that automates the building and deployment process.
create_or_update_lambda_function.sh
- Purpose: A custom shell script that creates or updates the Lambda function using the newly built Docker image. This script is executed as part of the post-build phase in CodeBuild to deploy/update the Lambda function.
src/
- Purpose: This directory contains the actual Python code defining the Lambda function logic, including the
lambda_handlerfunction. The contents of this folder are copied into the Docker container and are used as the main code for the Lambda function. Auxiliary code is stored in a subfolder calledmy_libs/to allow for the easy importation of functions from modules.
scripts/
- Purpose: This directory contains custom auxiliary scripts for managing the deployment process, like the
create_or_update_lambda_function.shscript.
create-roles.sh
- Purpose: This custom shell script creates the roles needed by the Lambda function, the CodeBuild project and the CodePipeline pipeline. It is only used during setup and could be removed after use.
File Contents
Let's briefly review the contents of each of the files.
requirements.txt
The requirements.txt file lists the dependencies required by the Lambda function code. The provided file includes just one library (numpy) for testing purposes, but it could include more:
numpyrequirements.txt
Dockerfile
The core of this setup is the Dockerfile. It defines the environment for your Lambda function. Here's the Dockerfile we'll use:
# Use the aws python3.12 lambda image
FROM public.ecr.aws/lambda/python:3.12

# Install the function's dependencies using file requirements.txt
# from your project folder.
COPY requirements.txt  .

RUN pip3 install -r requirements.txt

# Copy function code
COPY src/ ${LAMBDA_TASK_ROOT}

# Set the CMD to your handler
CMD [ "main.lambda_handler" ]
Dockerfile
- Uses the AWS-provided Python 3.12 runtime base image for Lambda.
- Installs dependencies from
requirements.txt. - Copies the Lambda function code from the
src/directory. - Sets the entry point to the
lambda_handlerfunction in themain.pyfile.
buildspec.yml
The buildspec.yml file defines how CodeBuild will package your code into a Docker image and push it to ECR. Here's the buildspec.yml file:
version: 0.2

phases:
  install:
    commands:
      # Fetch the unique SHA for tagging Docker images
      - SHA=$(echo $CODEBUILD_RESOLVED_SOURCE_VERSION)

  pre_build:
    commands:
      - echo Logging in to Amazon ECR...
      - aws ecr get-login-password --region ${REGION_ID} | docker login --username AWS --password-stdin ${ACCOUNT_ID}.dkr.ecr.${REGION_ID}.amazonaws.com

  build:
    commands:
      - echo Build started for commit $SHA
      - echo Building the Docker image...
      - docker build -t lambda-from-container-image:$SHA .
      - docker tag lambda-from-container-image:$SHA ${ACCOUNT_ID}.dkr.ecr.${REGION_ID}.amazonaws.com/lambda-from-container-image:$SHA

  post_build:
    commands:
      - echo Build completed for commit $SHA
      - echo Pushing the Docker image to ECR...
      - docker push ${ACCOUNT_ID}.dkr.ecr.${REGION_ID}.amazonaws.com/lambda-from-container-image:$SHA

      # Check if the Lambda function exists to update or create it
      - echo "Running the custom shell script..."
      - chmod +x scripts/create_or_update_lambda_function.sh   # Ensure the script is executable
      - ./scripts/create_or_update_lambda_function.sh
buildspec.yml
- Install Phase: Fetches the commit SHA for tagging.
- Pre-Build Phase: Logs into Amazon ECR using AWS CLI.
- Build Phase: Builds and tags the Docker image.
- Post-Build Phase: Pushes the image to ECR and triggers a custom script to update (or create) the Lambda function.
project-config.json
This file is used to create or configure a CodeBuild project, allowing AWS to build the source code, handle artifacts, and define environment settings for the build process. This configuration is essential for integrating CodeBuild into the CI/CD pipeline.
{
    "name": "MyLambdaBuildProject",
    "source": {
        "type": "GITHUB",
        "location": "https://github.com/${GITHUB_USERNAME}/${GITHUB_REPONAME}.git",
        "gitCloneDepth": 0,
        "gitSubmodulesConfig": {
            "fetchSubmodules": false
        },
        "buildspec": "",
        "reportBuildStatus": false,
        "insecureSsl": false
    },
    "secondarySources": [],
    "secondarySourceVersions": [],
    "artifacts": {
        "type": "S3",
        "location": "${ARTIFACTS_BUCKET_NAME}",
        "path": "",
        "namespaceType": "NONE",
        "name": "MyLambdaBuildProject",
        "packaging": "NONE",
        "overrideArtifactName": false,
        "encryptionDisabled": false
    },
    "secondaryArtifacts": [],
    "cache": {
        "type": "NO_CACHE"
    },
    "environment": {
        "type": "LINUX_CONTAINER",
        "image": "aws/codebuild/amazonlinux2-x86_64-standard:5.0",
        "computeType": "BUILD_GENERAL1_SMALL",
        "environmentVariables": [],
        "privilegedMode": false,
        "imagePullCredentialsType": "CODEBUILD"
    },
    "serviceRole": "arn:aws:iam::${ACCOUNT_ID}:role/containerlambdacicd-codebuild-role",
    "timeoutInMinutes": 60,
    "queuedTimeoutInMinutes": 480,
    "encryptionKey": "arn:aws:kms:${REGION_ID}:${ACCOUNT_ID}:alias/aws/s3",
    "tags": [],
    "logsConfig": {
        "cloudWatchLogs": {
            "status": "ENABLED"
        },
        "s3Logs": {
            "status": "DISABLED",
            "encryptionDisabled": false
        }
    },
    "fileSystemLocations": []
}
project-config.json
- Pulls code from a GitHub repository (
https://github.com/yourgithubname/yourprivaterepositoryname.git). - Stores build output in the
ARTIFACTS_BUCKET_NAMES3 bucket - Uses the
aws/codebuild/amazonlinux2-x86_64-standard:5.0image withBUILD_GENERAL1_SMALLcompute type. - Uses the
containerlambdacicd-codebuild-roleIAM role.
pipeline.json
The pipeline.json file defines the CodePipeline configuration, which coordinates building the container image and updating the Lambda function.
{
    "pipeline": {
        "name": "MyLambdaPipeline",
        "roleArn": "arn:aws:iam::381492102179:role/containerlambdacicd-codepipeline-role",
        "artifactStore": {
            "type": "S3",
            "location": "${ARTIFACTS_BUCKET_NAME}"
        },
        "stages": [
            {
                "name": "Source",
                "actions": [
                    {
                        "name": "Source",
                        "actionTypeId": {
                            "category": "Source",
                            "owner": "AWS",
                            "provider": "CodeStarSourceConnection",
                            "version": "1"
                        },
                        "runOrder": 1,
                        "configuration": {
                            "BranchName": "main",
                            "ConnectionArn": "${GITHUB_CONNECTION_ARN}",
                            "DetectChanges": "true",
                            "FullRepositoryId": "${GITHUB_USERNAME}/${GITHUB_REPONAME}",
                            "OutputArtifactFormat": "CODE_ZIP"
                        },
                        "outputArtifacts": [
                            {
                                "name": "SourceArtifact"
                            }
                        ],
                        "inputArtifacts": [],
                        "region": "${REGION_ID}",
                        "namespace": "SourceVariables"
                    }
                ]
            },
            {
                "name": "BuildAndDeploy",
                "actions": [
                    {
                        "name": "BuildAndDeploy",
                        "actionTypeId": {
                            "category": "Build",
                            "owner": "AWS",
                            "provider": "CodeBuild",
                            "version": "1"
                        },
                        "runOrder": 1,
                        "configuration": {
                            "ProjectName": "MyLambdaBuildProject"
                        },
                        "outputArtifacts": [
                            {
                                "name": "BuildArtifact"
                            }
                        ],
                        "inputArtifacts": [
                            {
                                "name": "SourceArtifact"
                            }
                        ],
                        "region": "${REGION_ID}",
                        "namespace": "BuildVariables"
                    }
                ]
            }
        ],
        "version": 5,
        "executionMode": "QUEUED",
        "pipelineType": "V2",
        "triggers": [
            {
                "providerType": "CodeStarSourceConnection",
                "gitConfiguration": {
                    "sourceActionName": "Source",
                    "push": [
                        {
                            "branches": {
                                "includes": [
                                    "main"
                                ]
                            }
                        }
                    ]
                }
            }
        ]
    }
}
pipeline.json
- Specifies stages like
Source(to pull the code from GitHub) andBuild(to invoke CodeBuild). - Configures the source action using CodeStar connection to the GitHub repository.
src/main.py
This is the entry point for the Lambda function. It contains the lambda_handler function that AWS Lambda invokes. This code demonstrates using both internal and external libraries, interacting with environment variables, and performing complex calculations using NumPy, all in the context of an AWS Lambda container.
import json
import os
import ast
# Importing internal libraries
from my_libs.helper_module import helper_function
from my_libs.another_helper_module import another_helper_function
# Importing external libraries
import numpy as np

def lambda_handler(event, context):
    # Run different types of helper functions
    print(helper_function())
    print(another_helper_function())
    print(f"Calculations performed by a call to the numpy library: {helper_using_numpy_library()}")
    # Return from Lambda
    return {
        'statusCode': 200,
        'body': json.dumps({
            'message': 'This is the data returned by the container running within Lambda!'
        })
    }

def helper_using_numpy_library():
    # Retrieve the NumPy array from the environment
    input_str = os.getenv("NUMPY_ARRAY")
    if input_str is None:
        return ("Environment Variable NUMPY_ARRAY does not exist")
    if input_str == "":
        return ("No value provided in Environment Variable NUMPY_ARRAY")
    # TODO: Add regex to validate the value provided

    input_array = ast.literal_eval(input_str)
    print(f"Value of NUMPY_ARRAY Environment Variable: {input_array}")
    data = np.array(input_array)
    # Reshape the array into a 2D array (matrix)
    data_reshaped = data.reshape(2, 5)
    # Perform matrix multiplication
    matrix_result = np.dot(data_reshaped, data_reshaped.T)  # Matrix multiplication of the array with its transpose

    return(matrix_result)
src/main.py
- Uses internal libraries (
helper_function,another_helper_function) and external libraries (numpy). - Accesses environment variables with
osand parses them withast. - The
lambda_handler(event, context)function calls helper functions and a test function performing some NumPy operations. - Returns a JSON response with an HTTP 200 status.
- The
helper_using_numpy_library()function fetches theNUMPY_ARRAYenvironment variable, converts it to a NumPy array, reshapes it, and performs matrix multiplication.
src/my_libs/helper_module.py
helper_module.py and another_helper_module.py contain utility functions or logic that can be reused across different parts of the code. They may have contained functions like data processing utilities, or more specific helper functions relevant to the main function logic. They print some output that we can see in the Lambda function logs.
def helper_function():
    return "This is a helper function."
src/my_libs/helper_module.py
src/my_libs/another_helper_module.py
def another_helper_function():
    return "This is a another helper function."
src/my_libs/another_helper_module.py
scripts/create_or_update_lambda_function.sh
The script used in the post-build phase is responsible for creating or updating the Lambda function with the newly built Docker image:
echo "This is the image tag to be used: $SHA"
if aws lambda get-function --function-name container-lambda; then
  echo "Updating Lambda function code..."
  aws lambda update-function-code --function-name container-lambda \
    --image-uri ${ACCOUNT_ID}.dkr.ecr.${REGION_ID}.amazonaws.com/lambda-from-container-image:$SHA
else
  echo "Creating new Lambda function 'container-lambda'..."
  aws lambda create-function --function-name container-lambda \
    --package-type Image \
    --code ImageUri=${ACCOUNT_ID}.dkr.ecr.${REGION_ID}.amazonaws.com/lambda-from-container-image:$SHA \
    --role arn:aws:iam::${ACCOUNT_ID}:role/lambda-execution-role \
    --environment Variables="{NUMPY_ARRAY='[1, 2, 3, 4, 5, 6, 7, 8, 9, 10]'}" \
    --region ${REGION_ID}
fi
create_or_update_lambda_function.sh
- Checks if the Lambda function already exists.
- If it does, it updates the function with the new Docker image URI from ECR.
- If it does not exist, it creates a new Lambda function with the specified settings.
Step-by-Step Setup Guide
Copy the GitHub repository
Copy the repository into a new one you will own using the following link:
Copy to a new repository from the repository template
Clone your new GitHub repository
Assuming you called your new repo containerlambdacicd-blog-mycopy, change the yourgithubname string to your GitHub username (or Org) and run this on your machine:
git clone https://github.com/yourgithubname/containerlambdacicd-blog-mycopy.git
cd containerlambdacicd-blog-mycopy
Create the artifacts bucket
export ARTIFACTS_BUCKET_NAME=containerlambdacicd-blog-artifacts
aws s3 mb s3://$ARTIFACTS_BUCKET_NAME
Create the ECR repository
aws ecr create-repository --repository-name lambda-from-container-image
Create an AWS CodeConnections connection
- Go to: https://console.aws.amazon.com/codesuite/settings/connections
- Choose your AWS region if it has changed
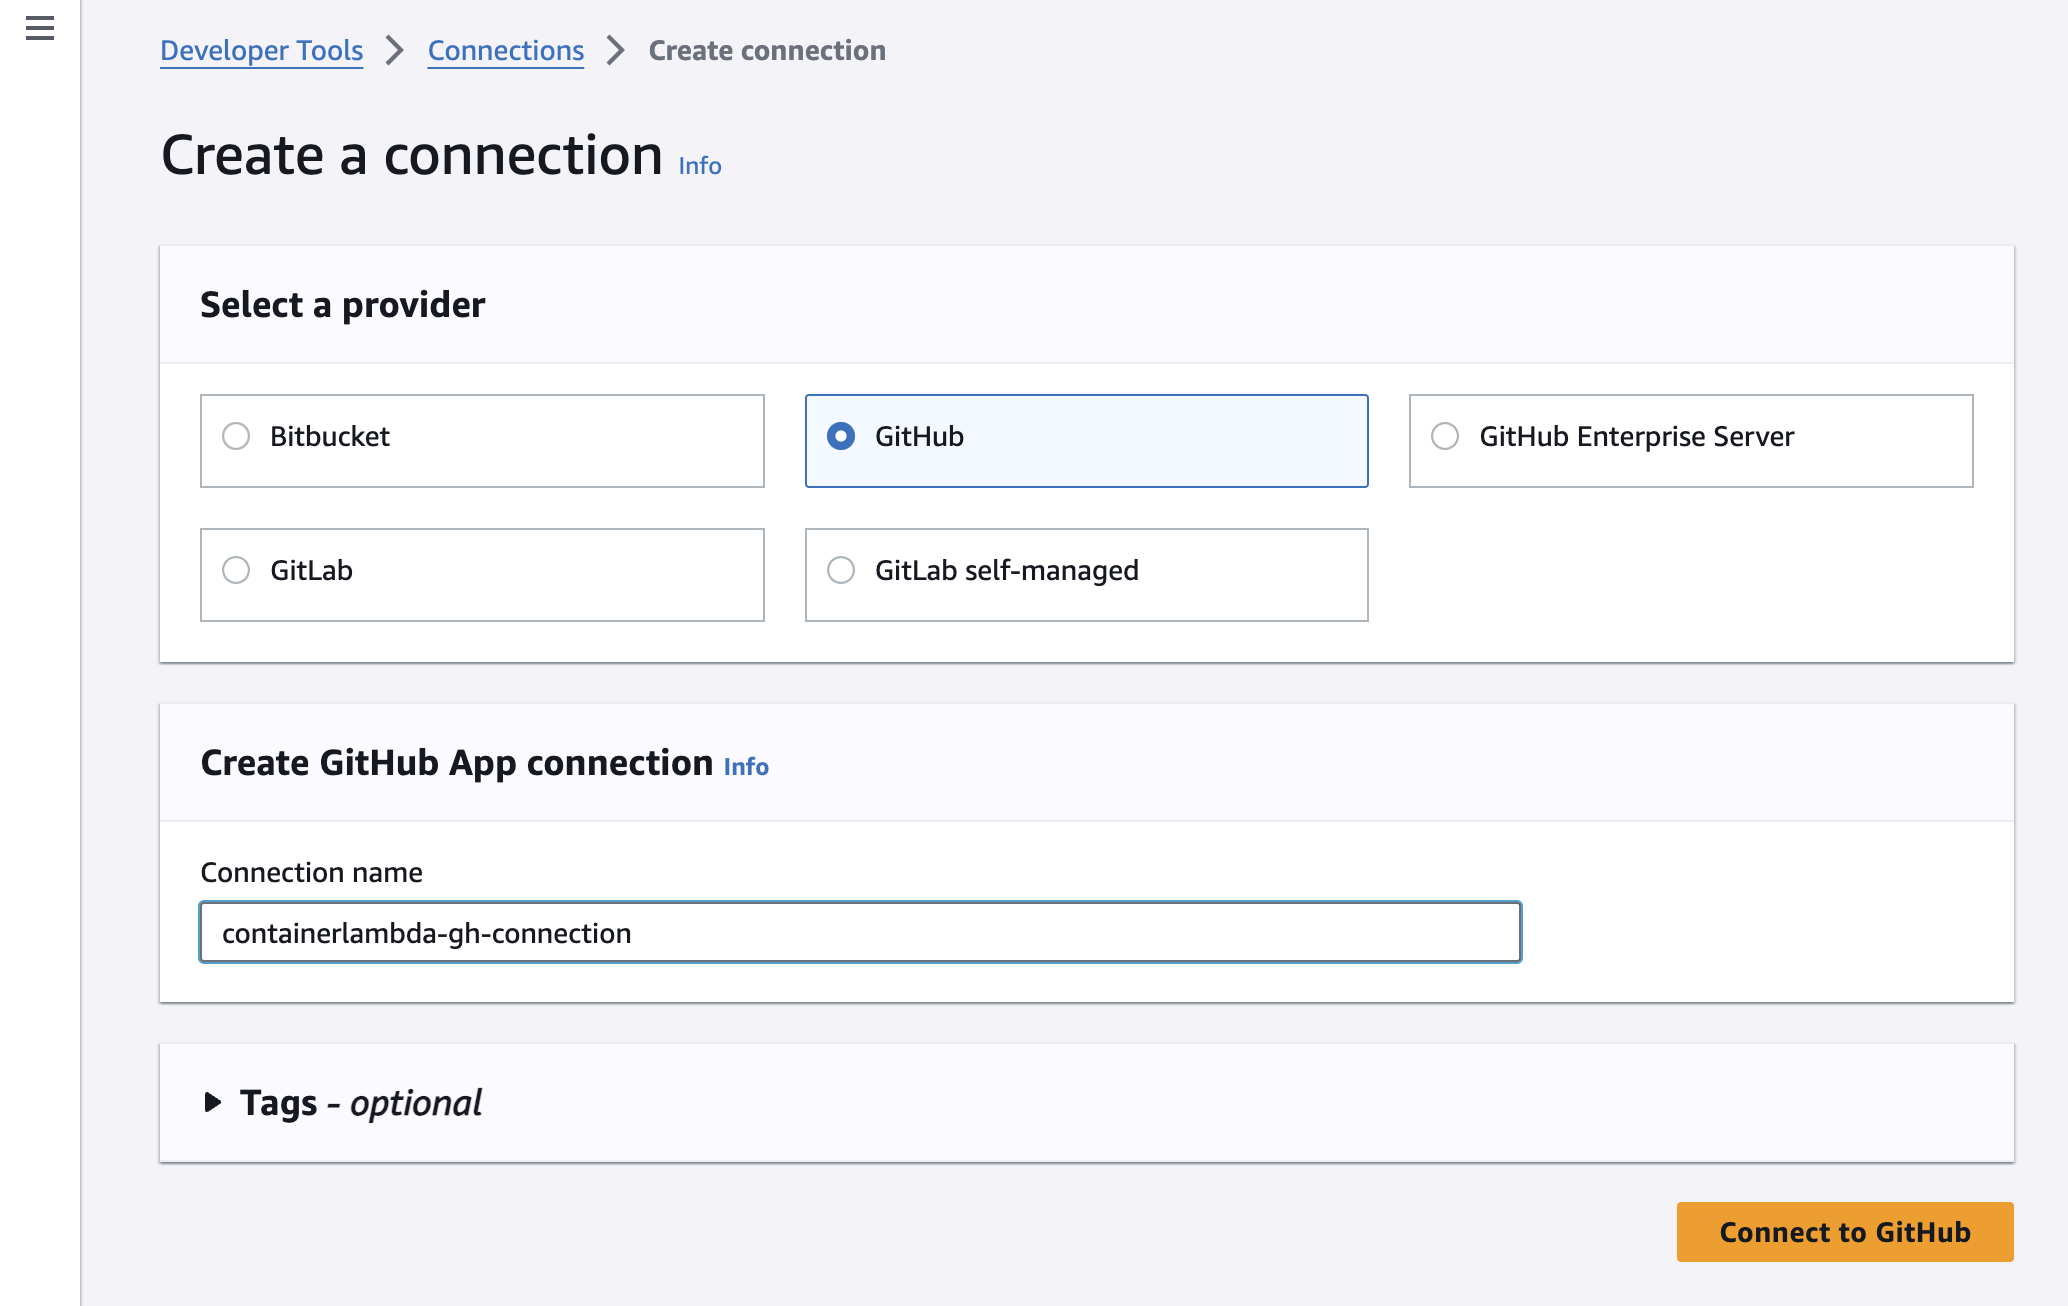
- Click on "Create Connection"
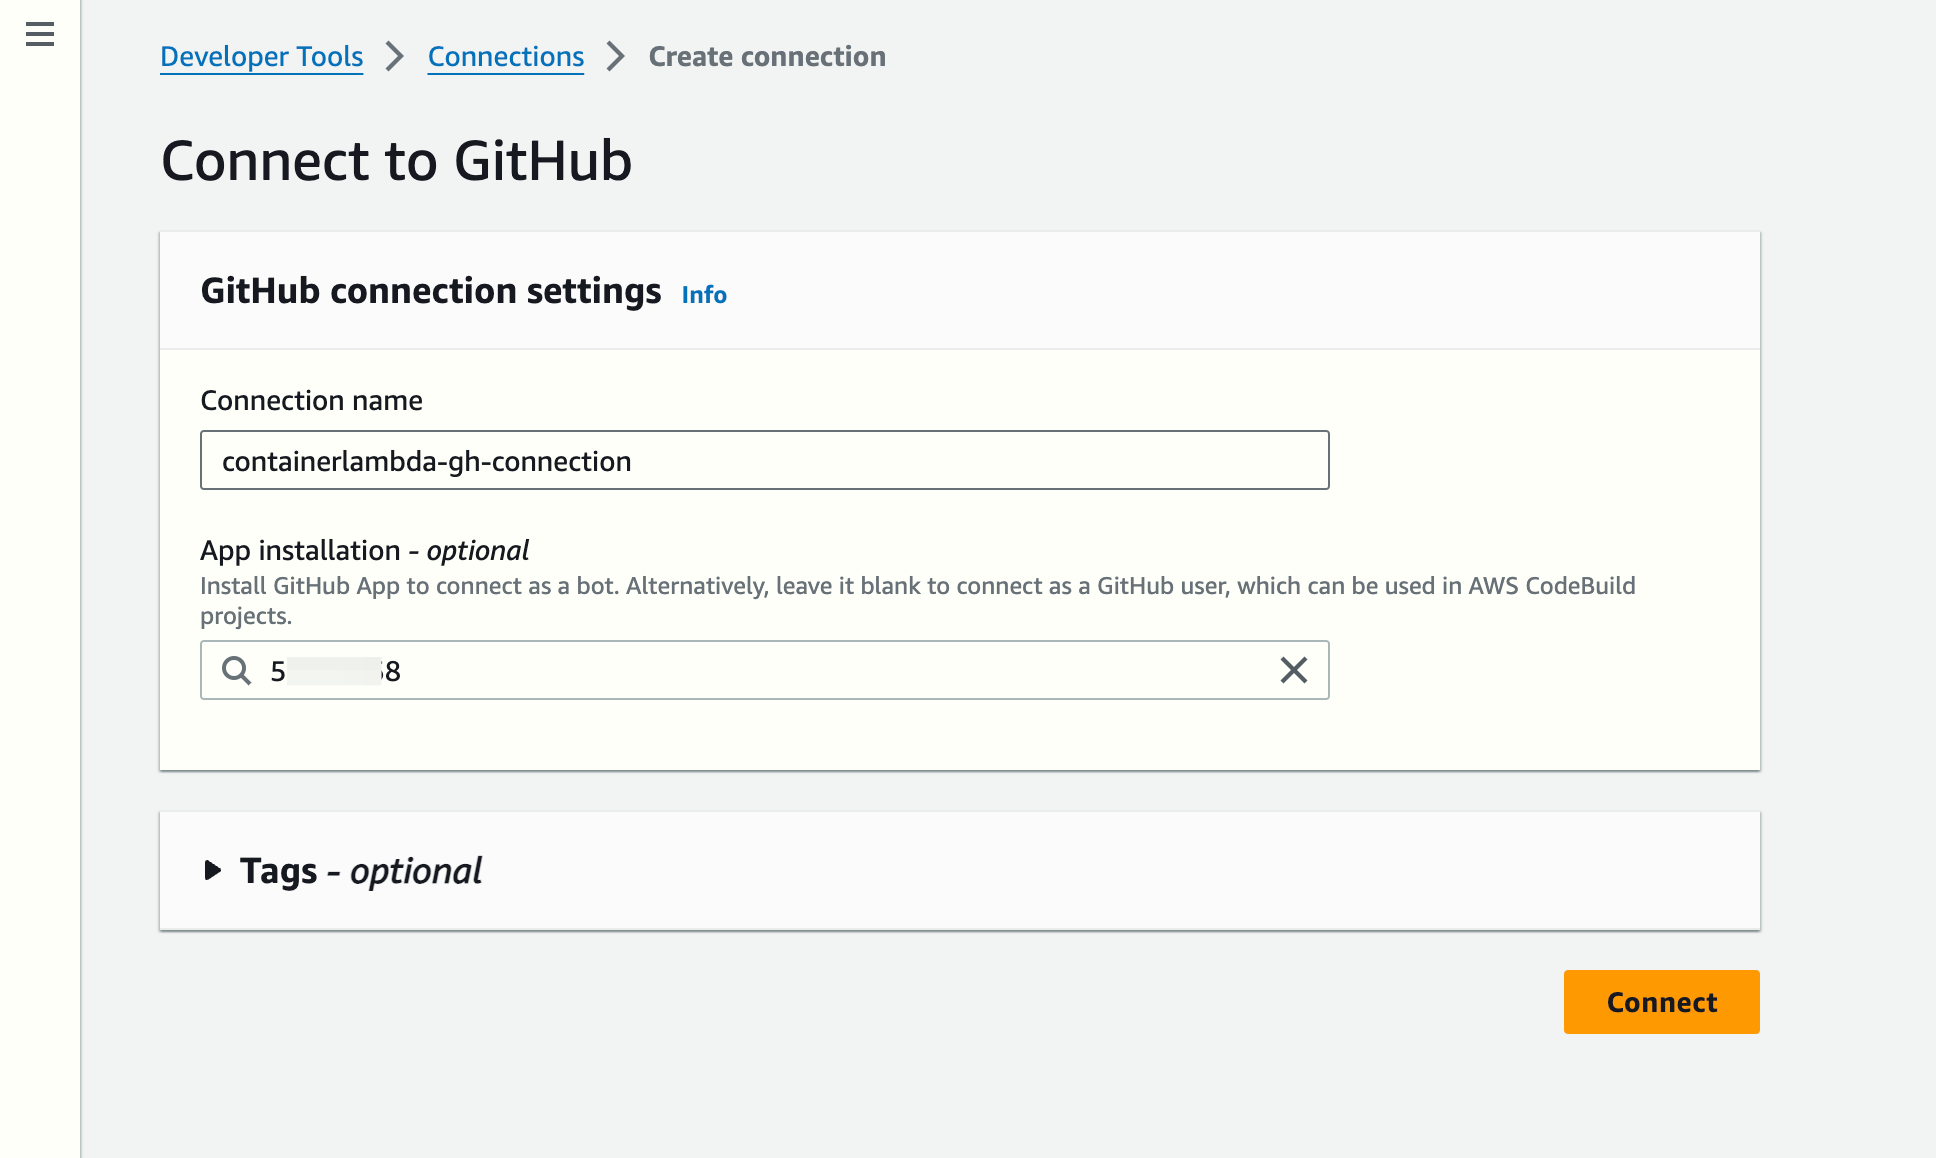
- Follow the instructions to create the connection to GitHub. The name is not important, but you can call it, for instance, containerlambda-gh-connection
- Choose your AWS region if it has changed and click on Connect
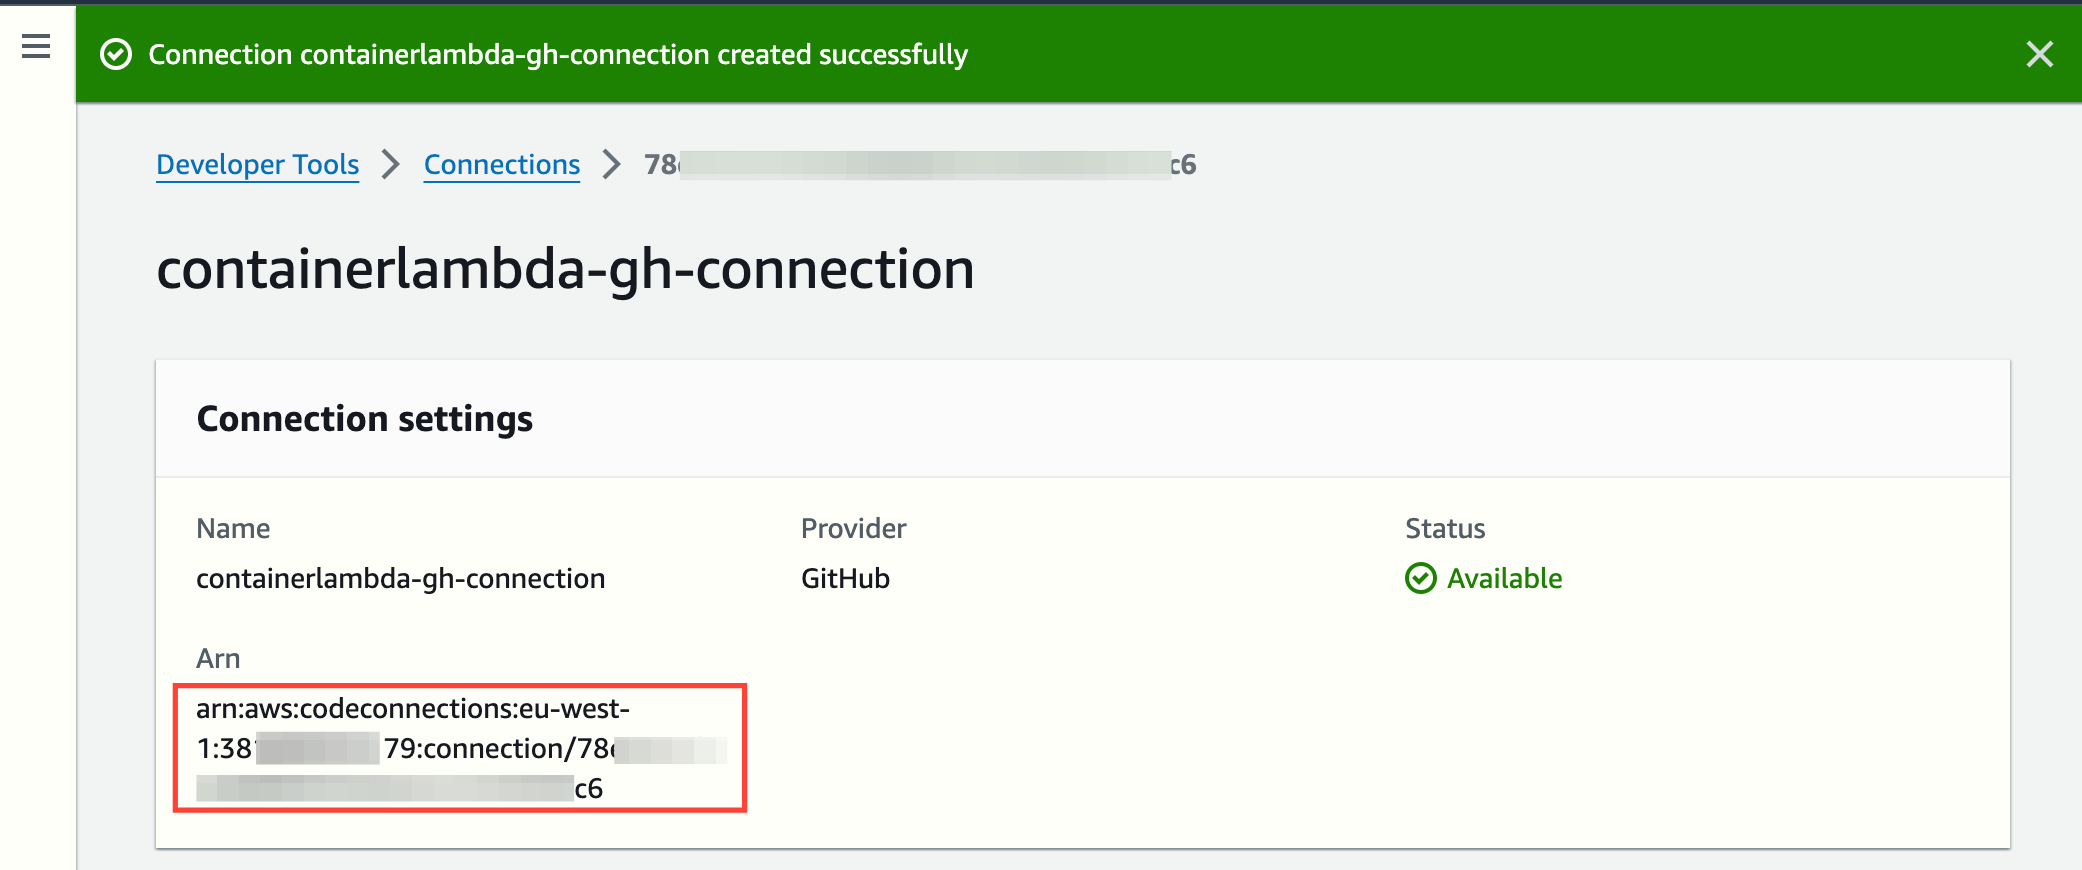
- Go back to https://console.aws.amazon.com/codesuite/settings/connections and copy the ARN of the new connection as you will assign it to an environment variable later
Replace placeholders in template files
IMPORTANT: You need to adapt the next environment variables and have the envsubst command in your machine.
More info about envsubst here: envsubst(1) - Linux manual page
Remember you have to edit these values:
export ACCOUNT_ID=YOUR_AWS_12_DIGIT_ACCOUNT_NUMBER
export REGION_ID=SOMETHING_LIKE_eu-west-1
export ARTIFACTS_BUCKET_NAME=THE_BUCKET_YOU_CREATED_PREVIOUSLY
export GITHUB_CONNECTION_ARN=THE_AWS_CODECONNECTIONS_CONNECTION_ARN
export GITHUB_USERNAME=yourgithubname
export GITHUB_REPONAME=containerlambdacicd-blog-mycopy
envsubst '${ACCOUNT_ID} ${REGION_ID}' < buildspec.yml.template > buildspec.yml
envsubst '${ARTIFACTS_BUCKET_NAME} ${GITHUB_CONNECTION_ARN} ${GITHUB_REPONAME} ${GITHUB_USERNAME} ${REGION_ID}' < pipeline.json.template > pipeline.json
envsubst '${ACCOUNT_ID} ${ARTIFACTS_BUCKET_NAME} ${GITHUB_CONNECTION_ARN} ${GITHUB_REPONAME} ${GITHUB_USERNAME} ${REGION_ID}' < project-config.json.template > project-config.json
envsubst '${ACCOUNT_ID} ${ARTIFACTS_BUCKET_NAME} ${GITHUB_CONNECTION_ARN} ${GITHUB_REPONAME} ${GITHUB_USERNAME} ${REGION_ID}' < create-roles.sh.template > create-roles.sh
envsubst '${ACCOUNT_ID} ${ARTIFACTS_BUCKET_NAME} ${GITHUB_CONNECTION_ARN} ${GITHUB_REPONAME} ${GITHUB_USERNAME} ${REGION_ID}' < scripts/create_or_update_lambda_function.sh.template > scripts/create_or_update_lambda_function.sh
Push the changes to your GitHub repository
git add .
git commit -m "generate new files from templates"
git push origin main
Create IAM roles
Create the roles assumed by the CodeBuild and CodePipeline services and the Lambda function:
chmod +x create-roles.sh
./create-roles.sh
Create the CodeBuild project and the CodePipeline pipeline
aws codebuild create-project --cli-input-json file://project-config.json

aws codepipeline create-pipeline --cli-input-json file://pipeline.json
Testing the Pipeline
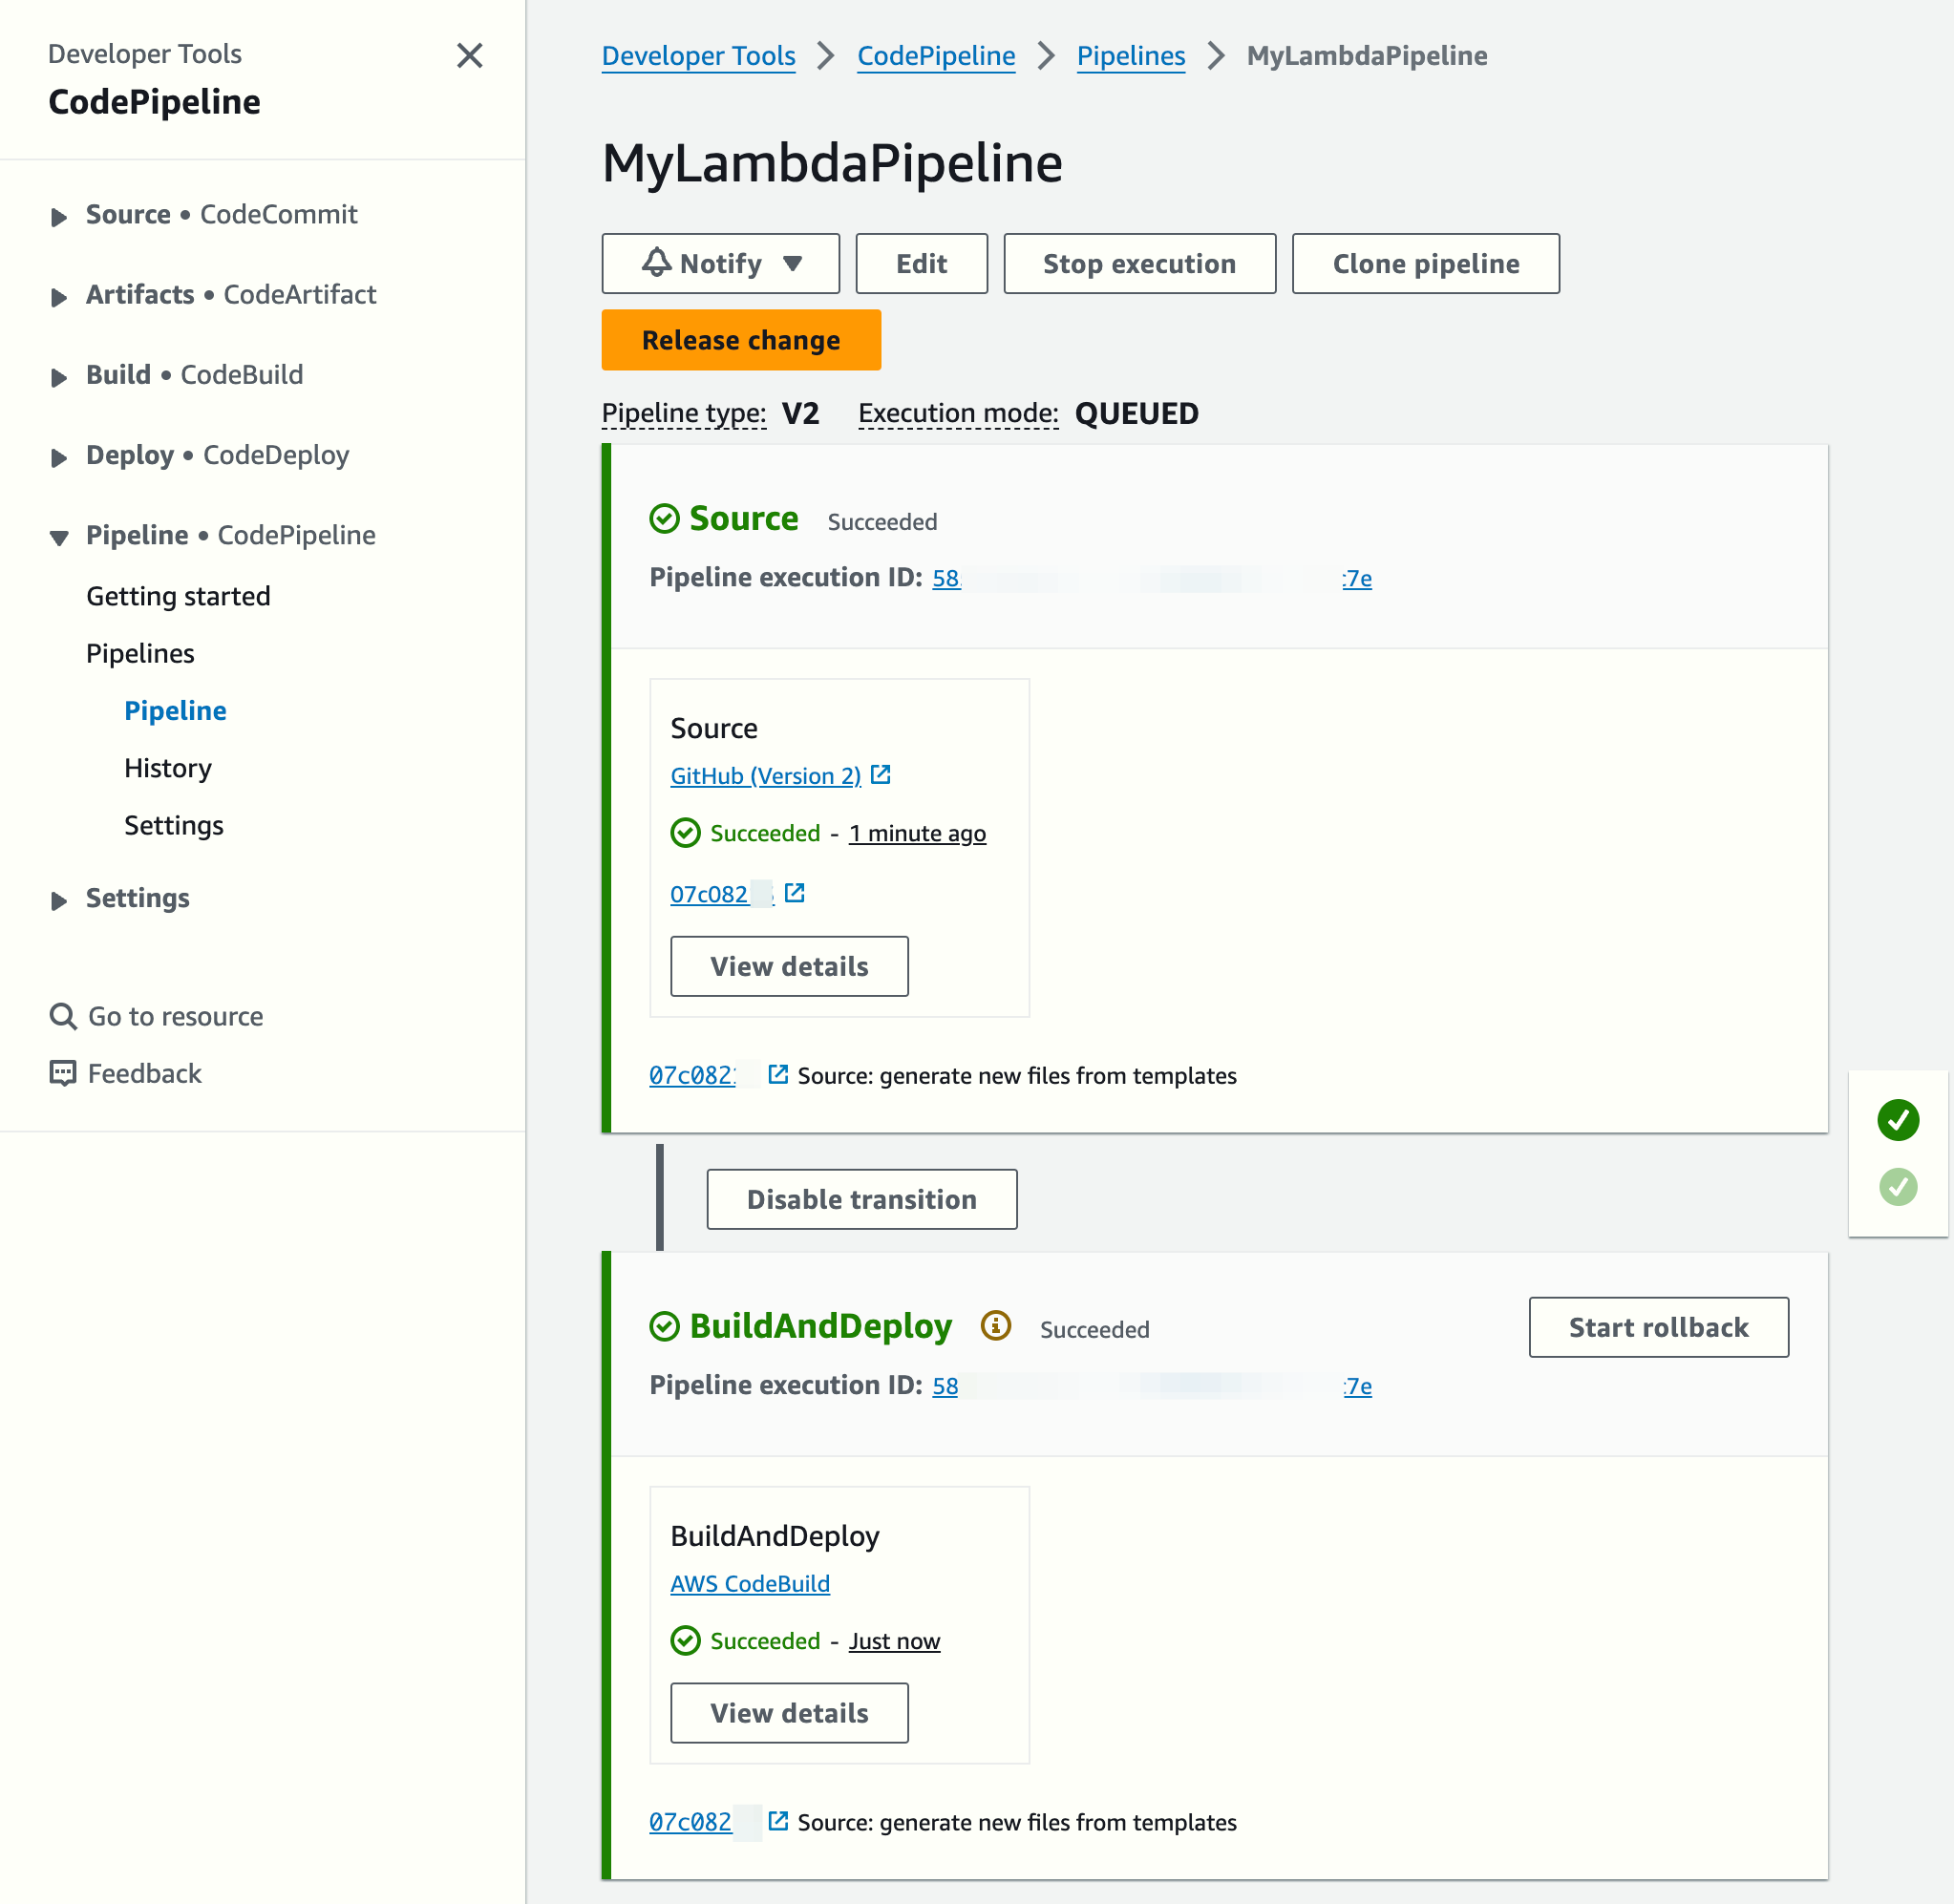
Review the first pipeline execution
The CodePipeline creation command will trigger the executions of the pipeline automatically.
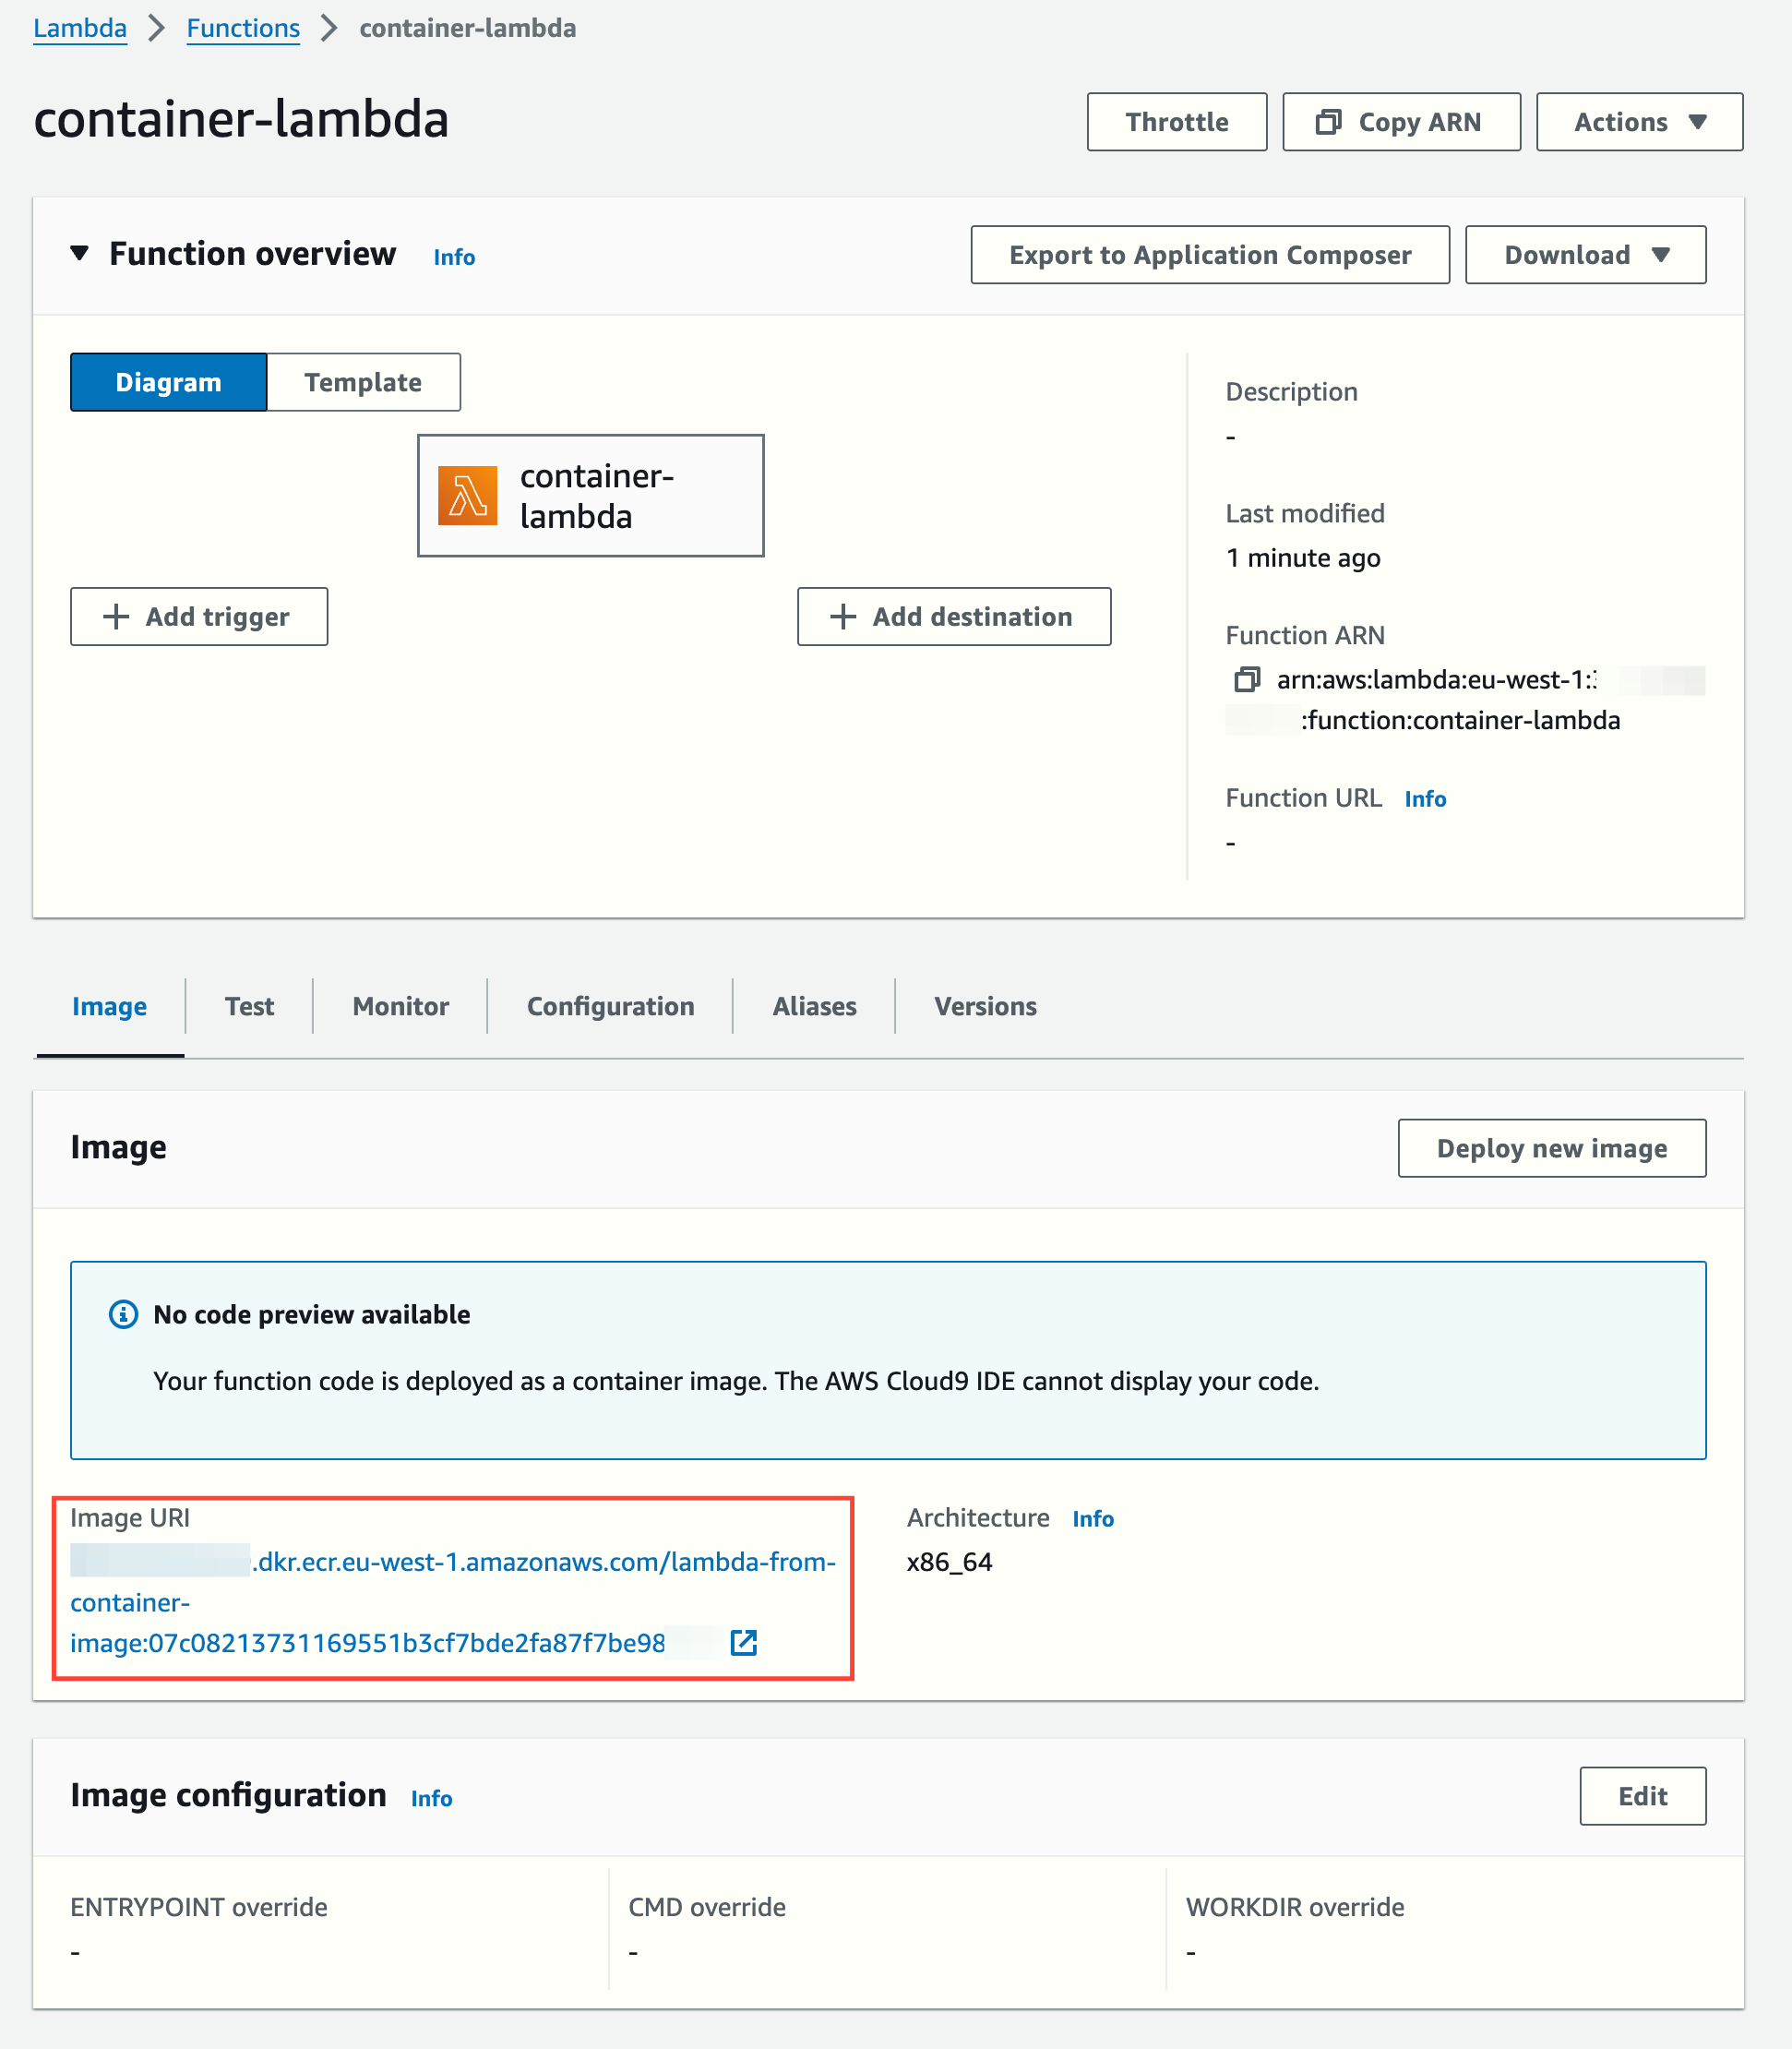
The Lambda function was created automatically. Notice it points to a container image:
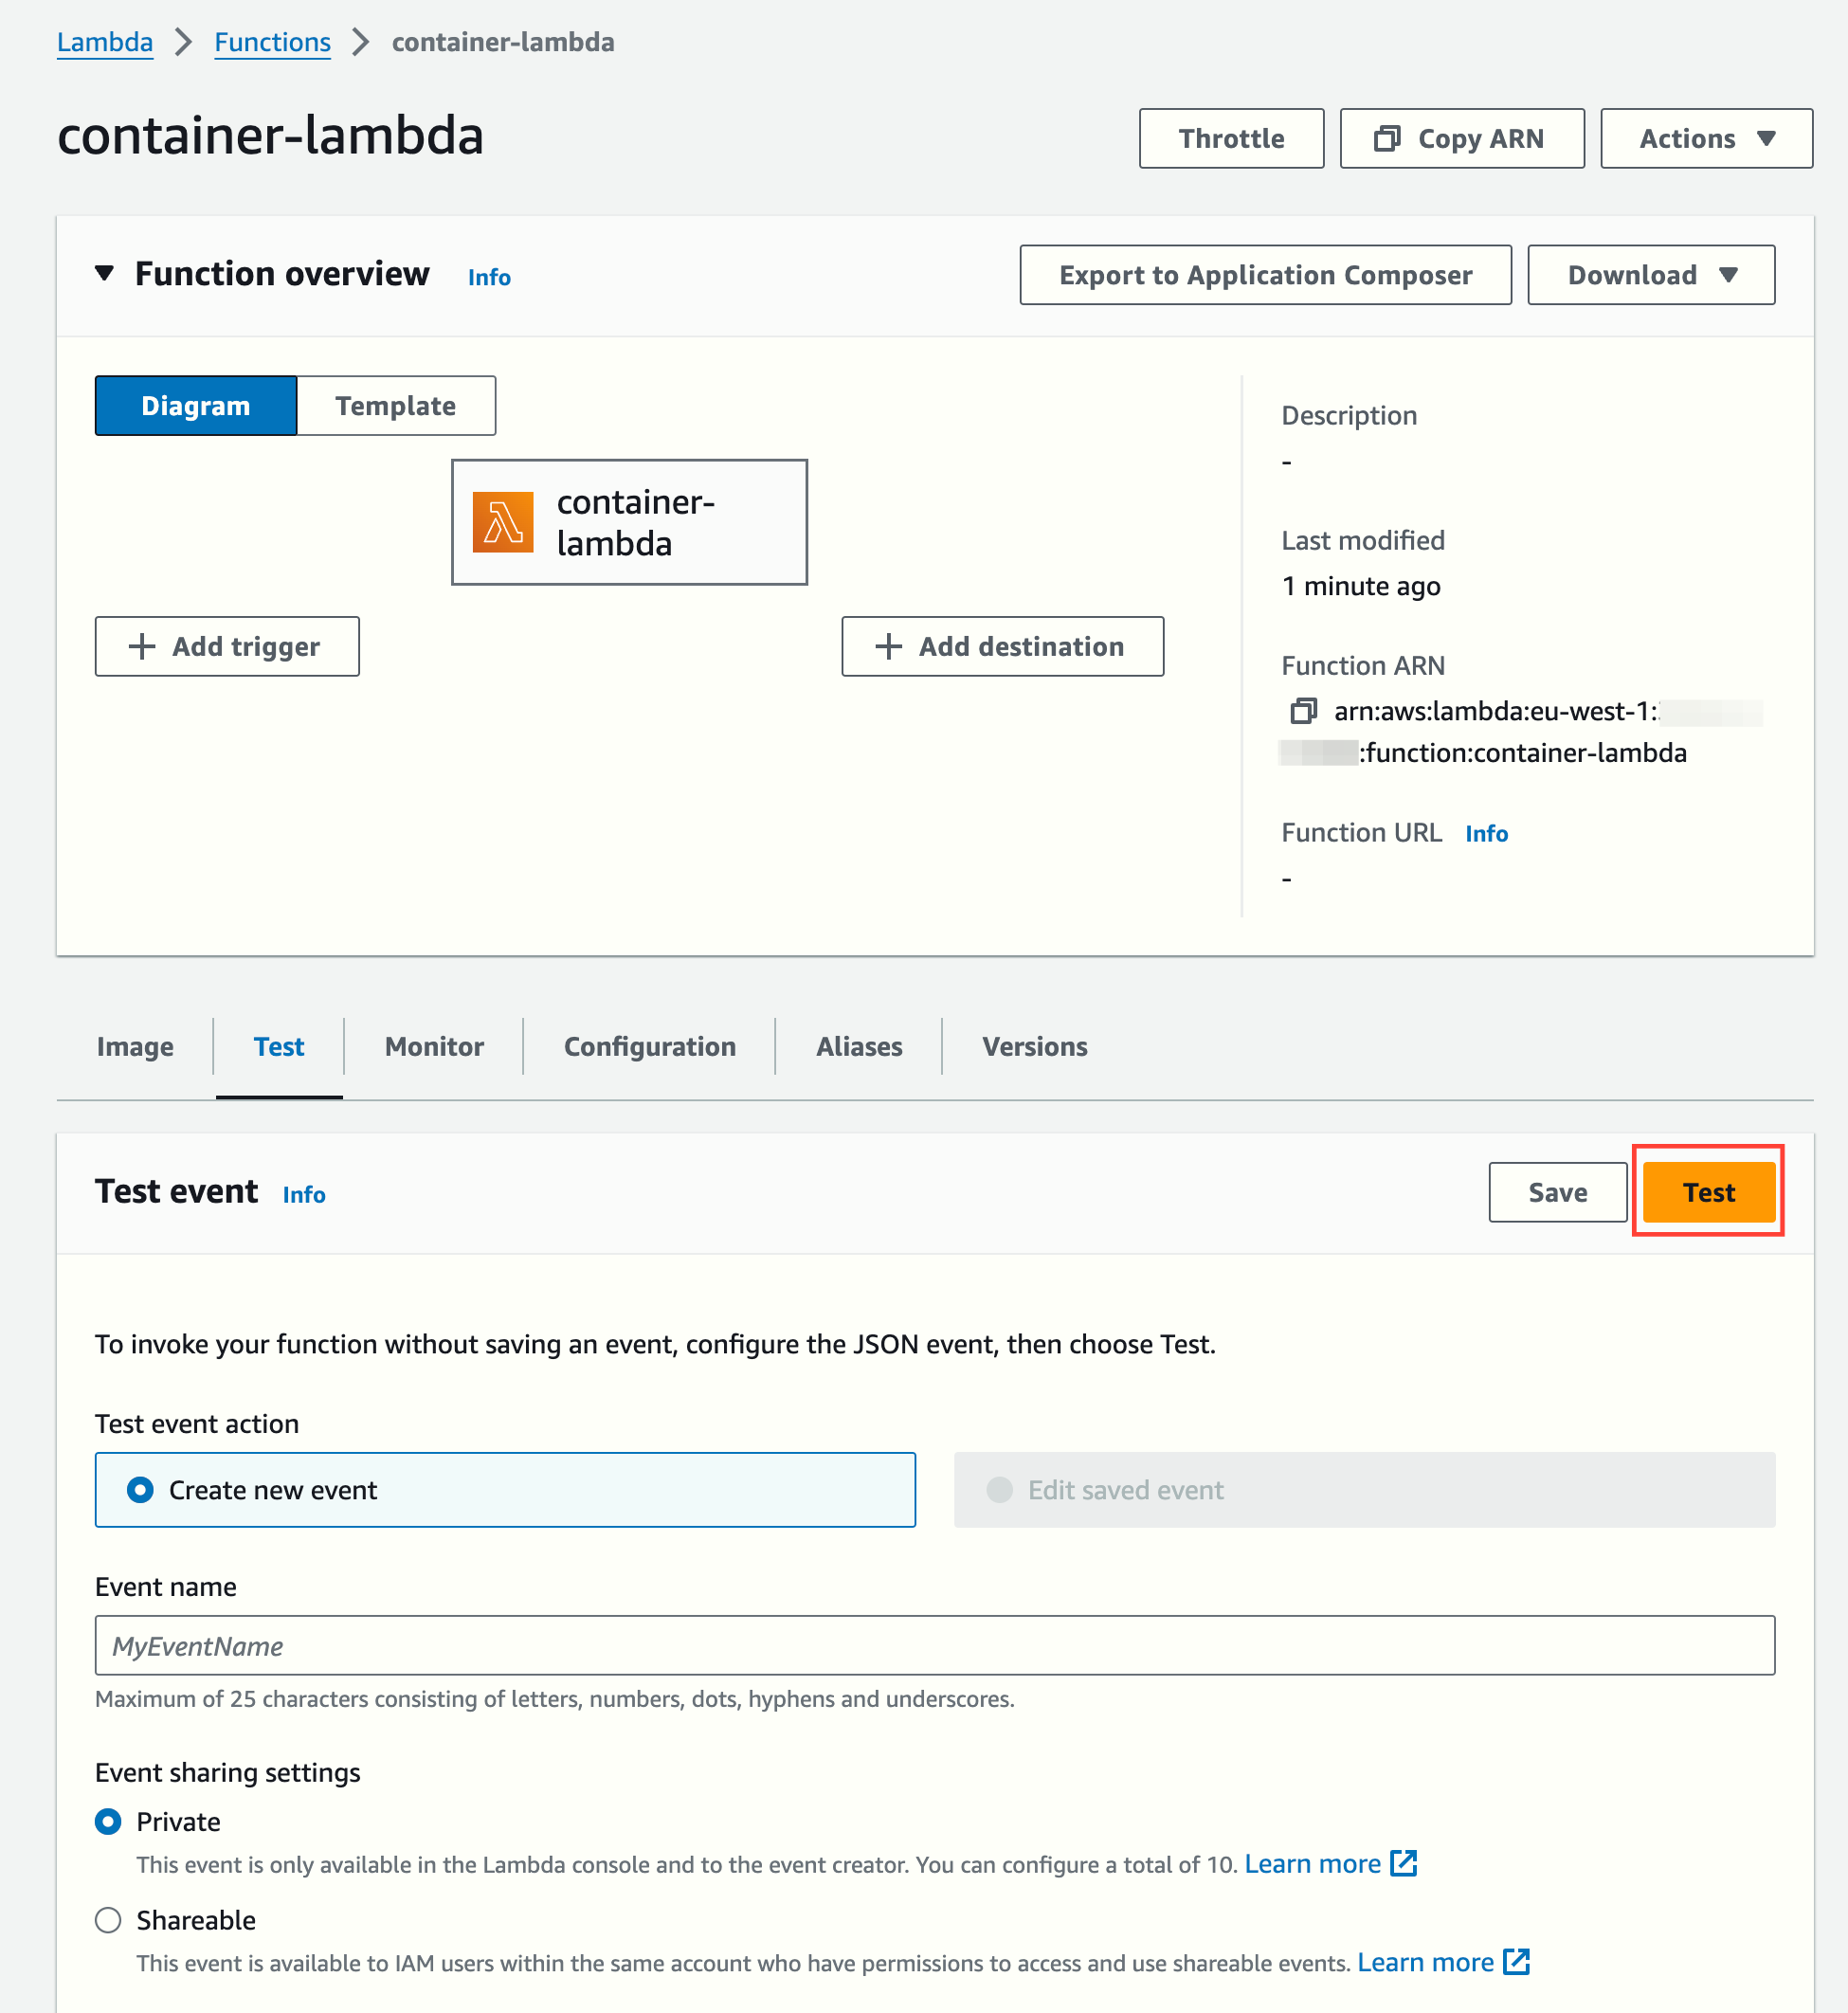
Let's test it directly (the function doesn't need any input data to run):
We can see the cold start duration and the returned data and logs from the Lambda function:
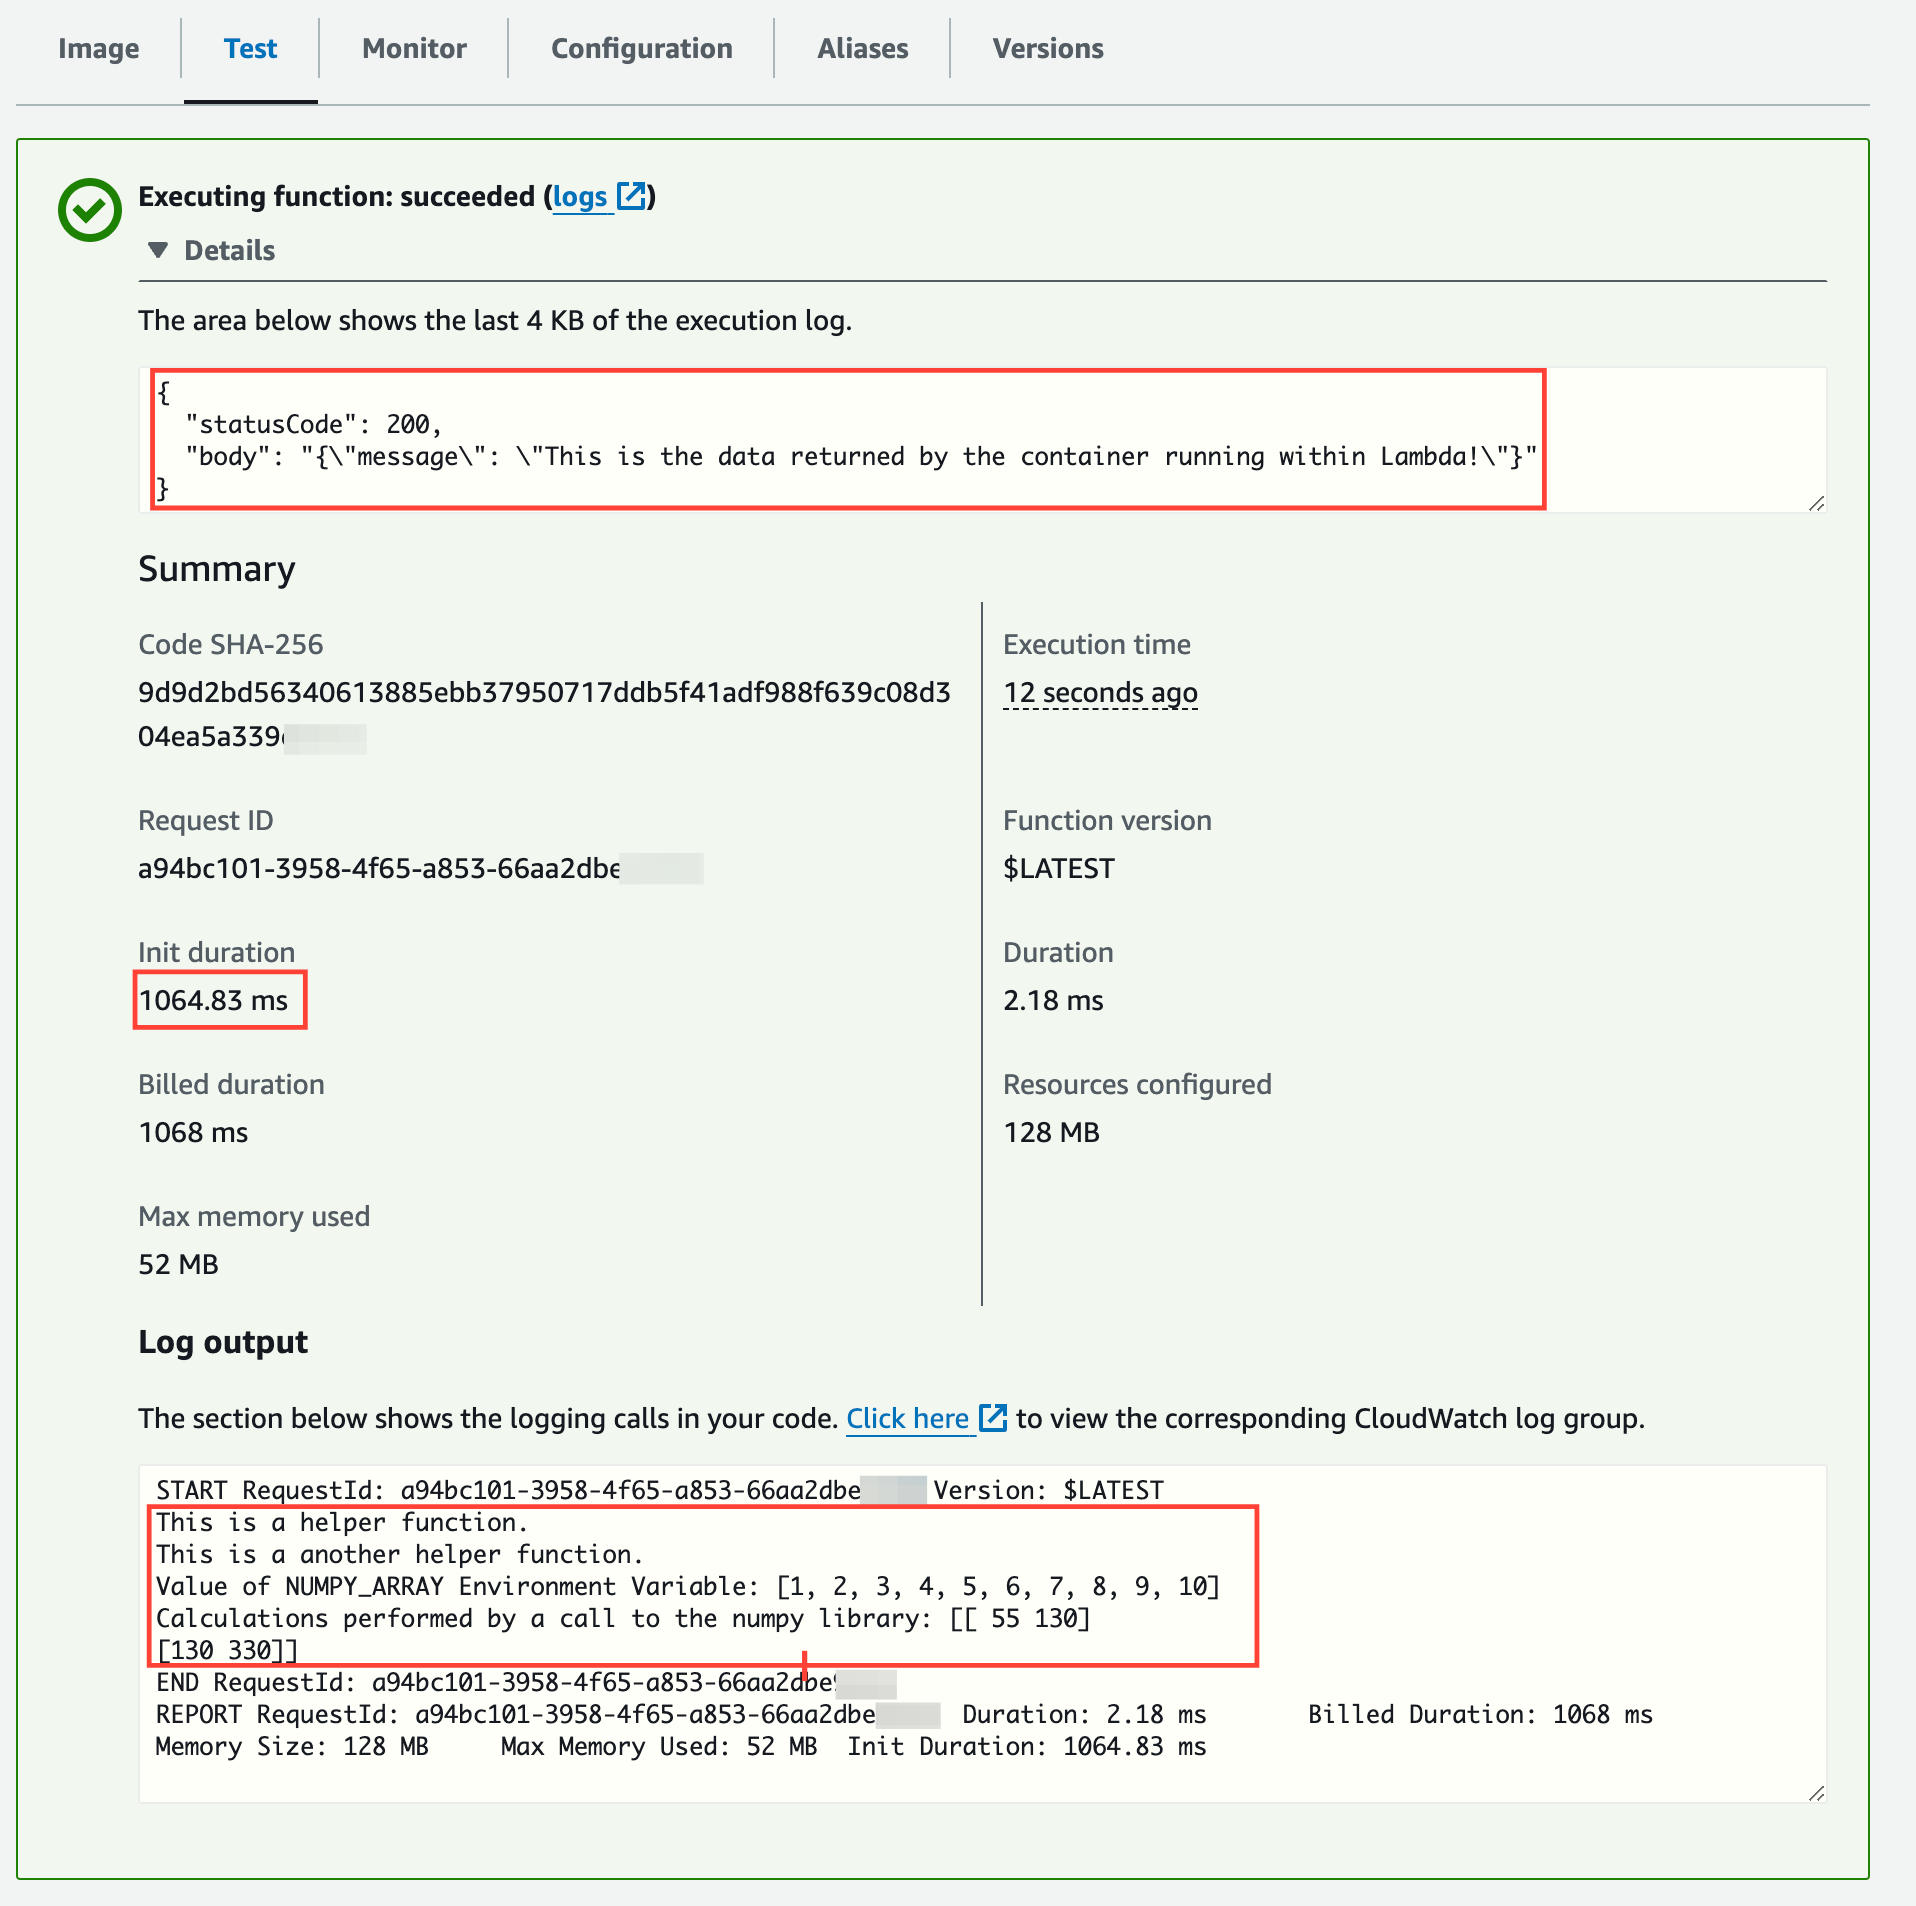
Notice the warm start execution duration:
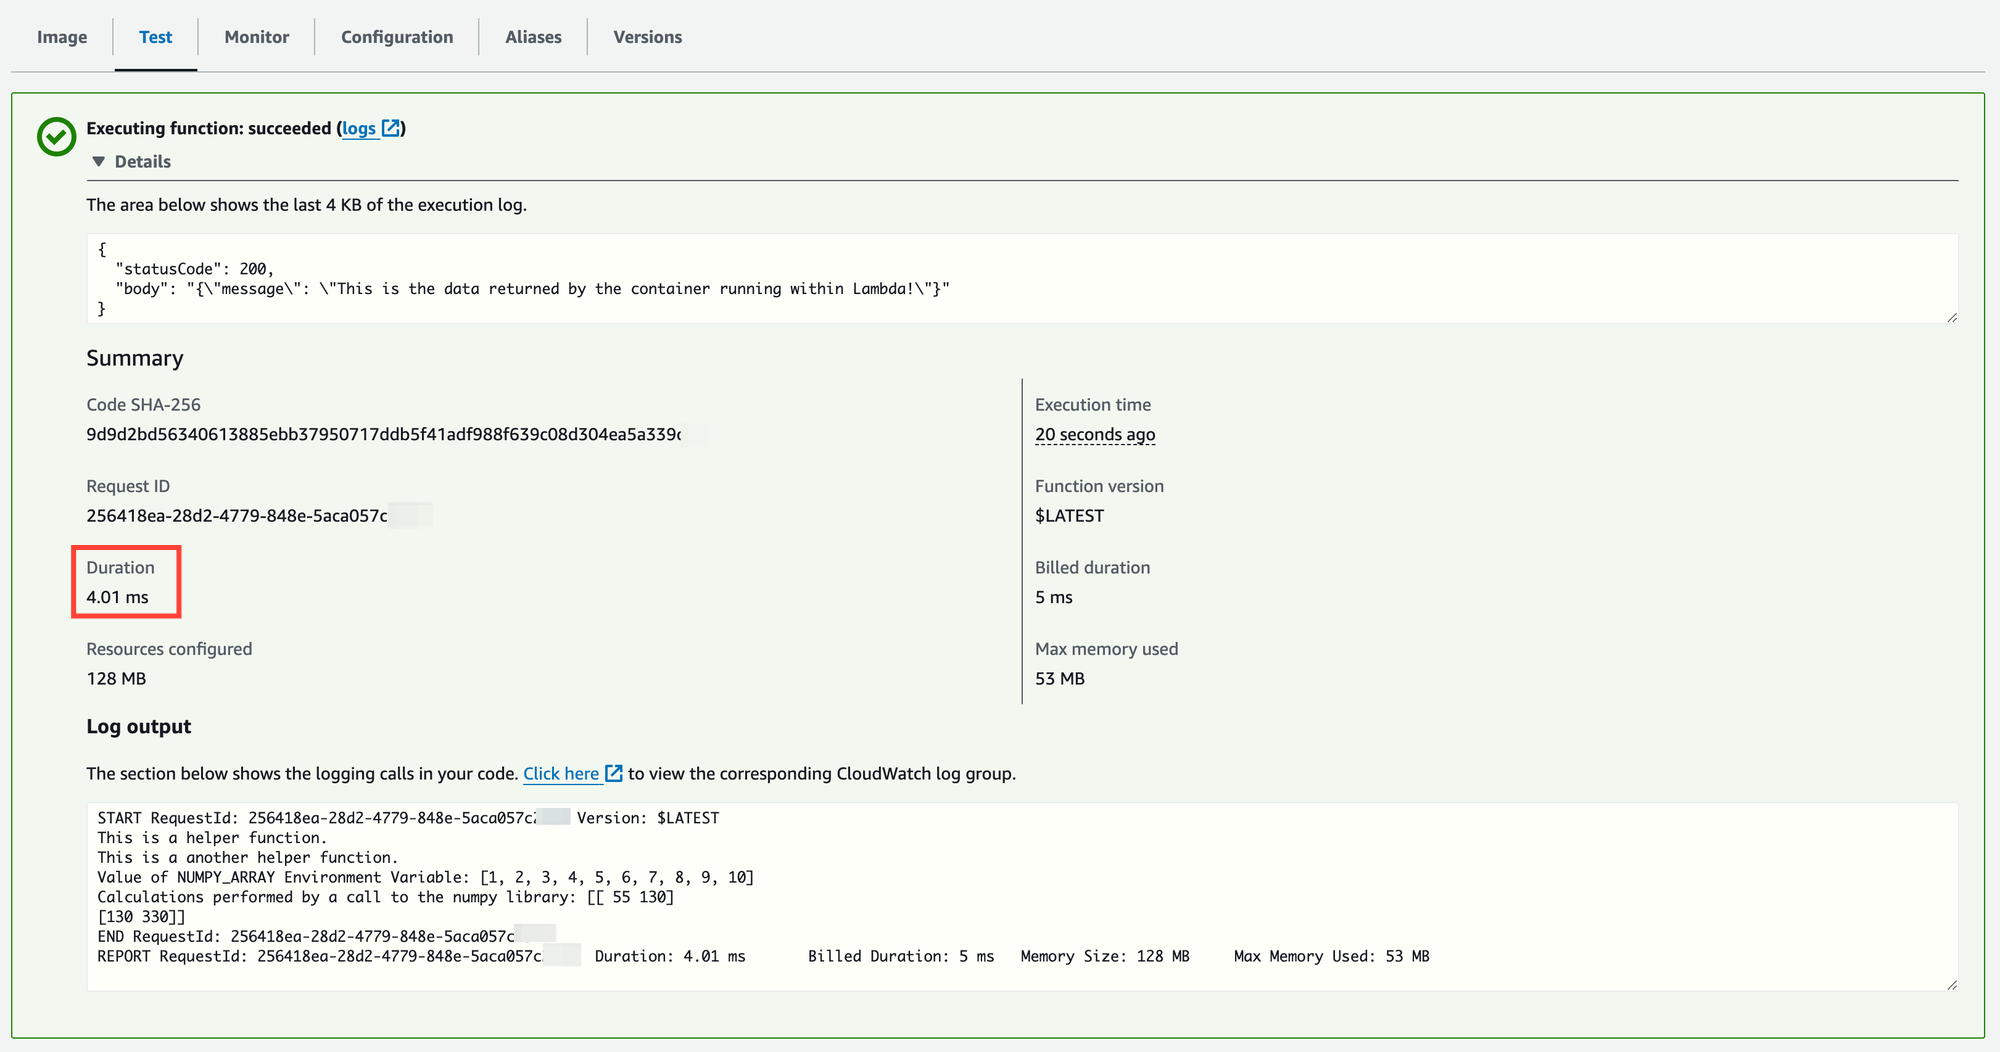
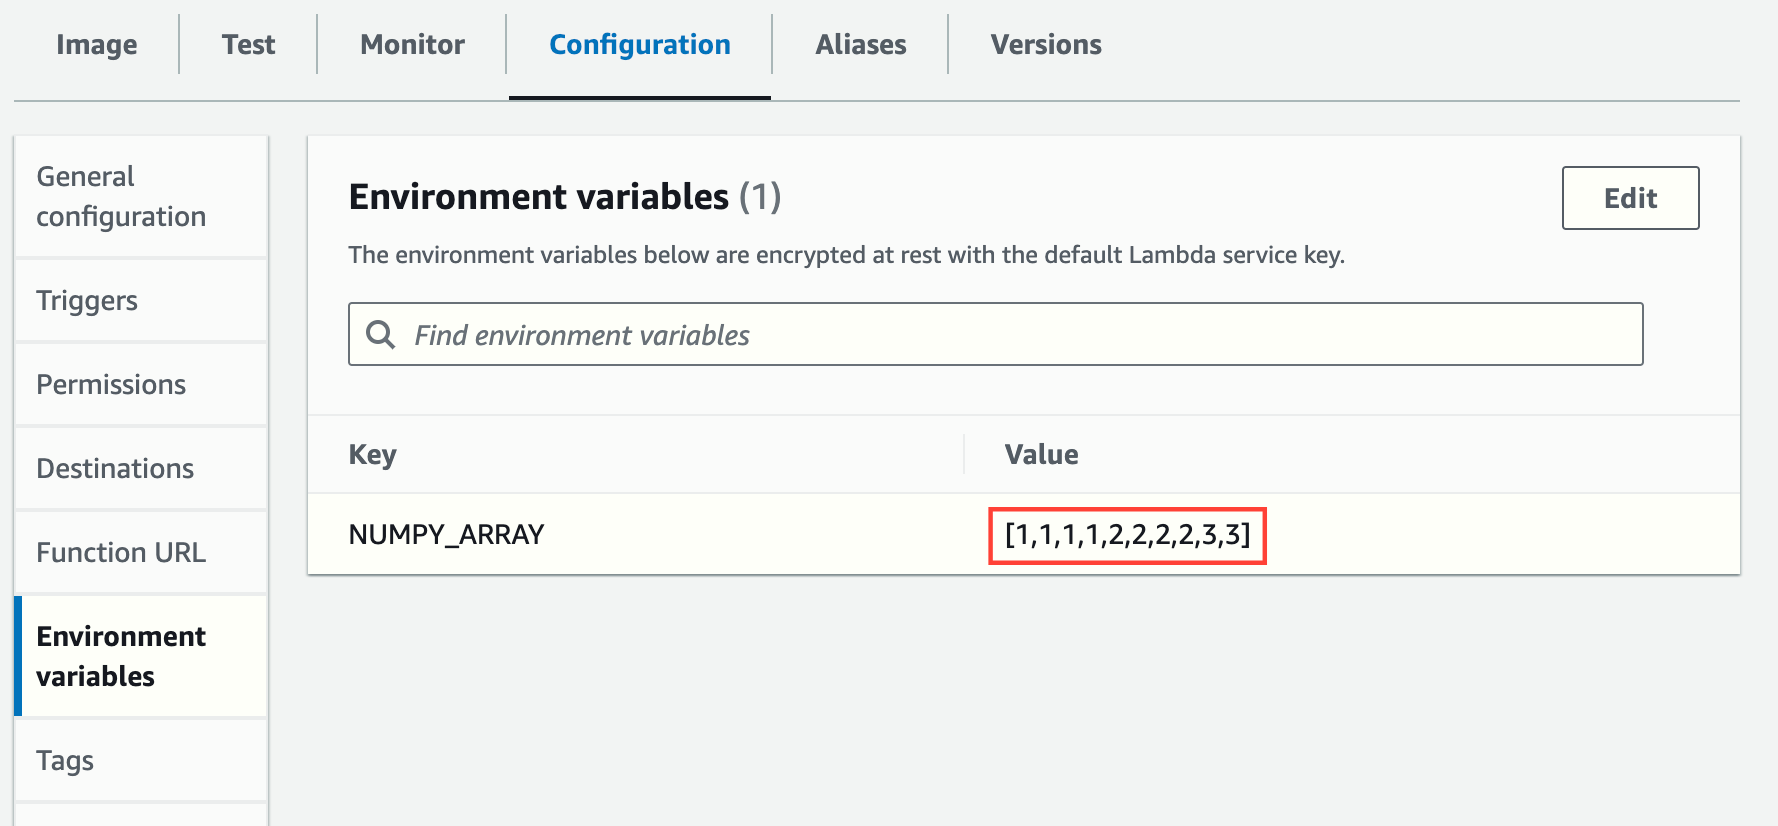
As additional tests, you can run the function with different parameters (editing the environment variable NUMPY_ARRAY or removing it altogether):
Change the Lambda code
Let's edit parts of the Lambda code and see how it is deployed automatically.
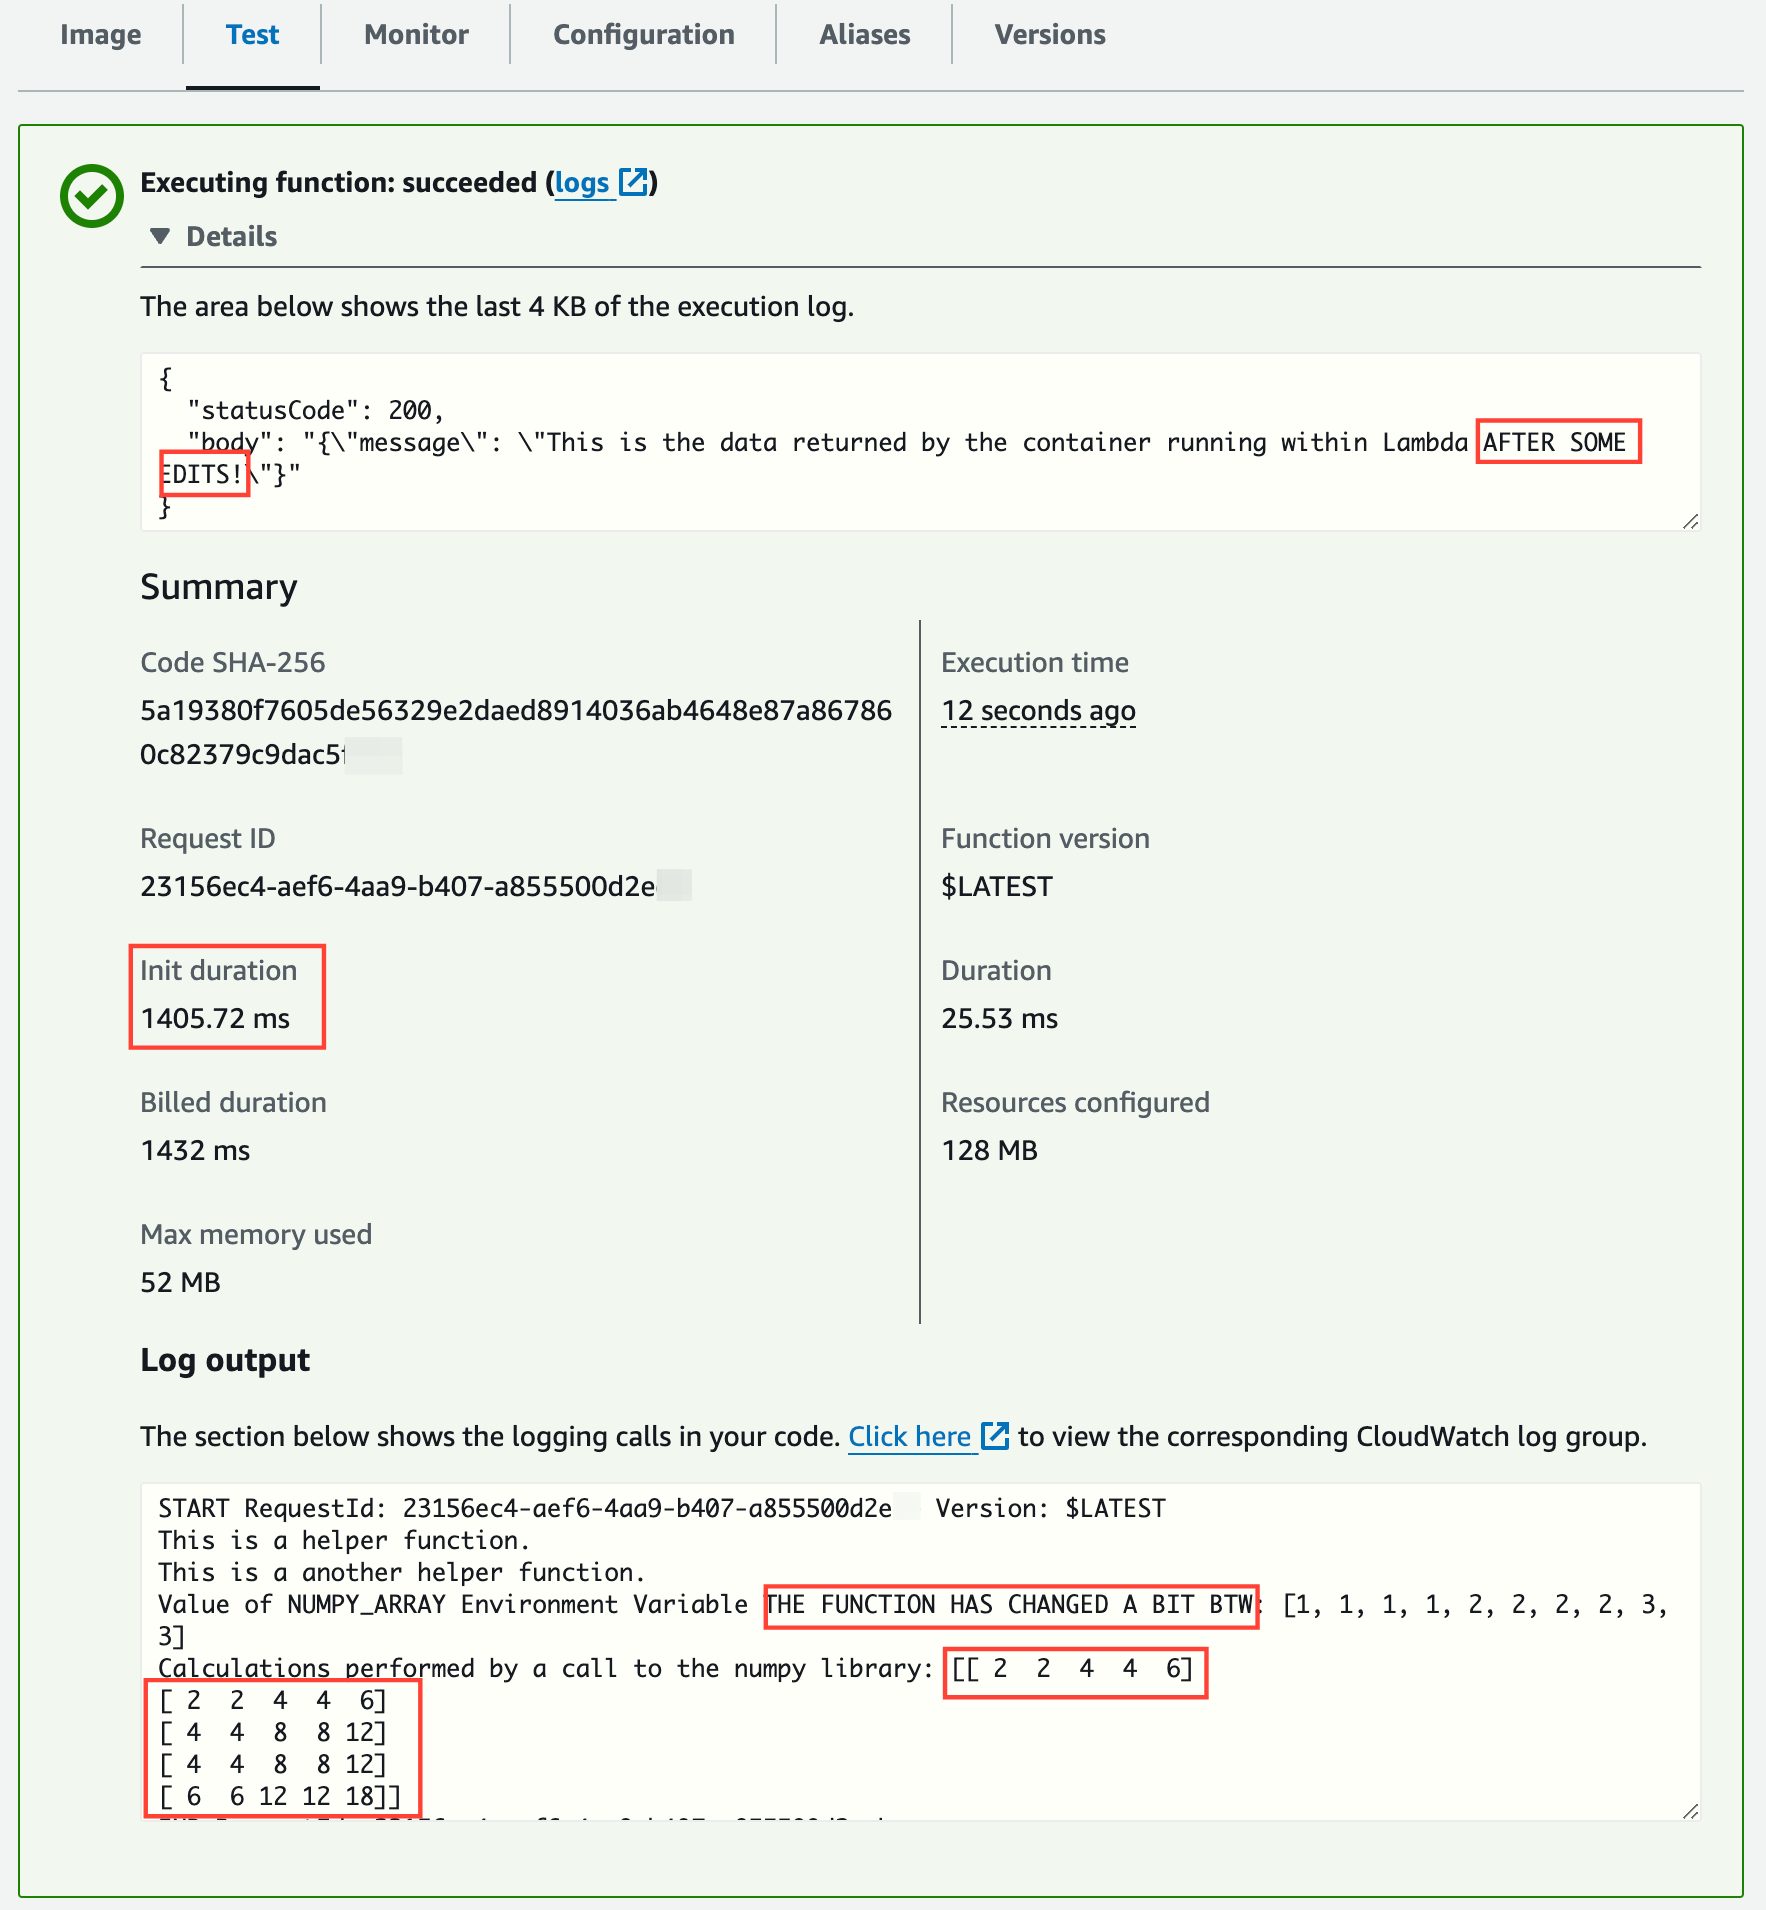
I've added the strings "AFTER SOME EDITS!" and "THE FUNCTION HAS CHANGED A BIT " into some of the output lines and changed the shape of the NumPy matrix from [2,5] to [5,2]:
import json
import os
import ast
# Importing internal libraries
from my_libs.helper_module import helper_function
from my_libs.another_helper_module import another_helper_function
# Importing external libraries
import numpy as np

def lambda_handler(event, context):
    # Run different types of helper functions
    print(helper_function())
    print(another_helper_function())
    print(f"Calculations performed by a call to the numpy library: {helper_using_numpy_library()}")
    # Return from Lambda
    return {
        'statusCode': 200,
        'body': json.dumps({
            'message': 'This is the data returned by the container running within Lambda AFTER SOME EDITS!'
        })
    }

def helper_using_numpy_library():
    # Retrieve the NumPy array from the environment
    input_str = os.getenv("NUMPY_ARRAY")
    if input_str is None:
        return ("Environment Variable NUMPY_ARRAY does not exist")
    if input_str == "":
        return ("No value provided in Environment Variable NUMPY_ARRAY")
    # TODO: Add regex to validate the value provided

    input_array = ast.literal_eval(input_str)
    print(f"Value of NUMPY_ARRAY Environment Variable THE FUNCTION HAS CHANGED A BIT BTW: {input_array}")
    data = np.array(input_array)
    # Reshape the array into a 2D array (matrix)
    data_reshaped = data.reshape(5, 2)
        # Perform matrix multiplication
    matrix_result = np.dot(data_reshaped, data_reshaped.T)  # Matrix multiplication of the array with its transpose

    return(matrix_result)
Let's commit the changes and see how the pipeline is triggered automatically and a new image for the Lambda function is deployed:
git add .
git commit -m "edit the Lambda code"
git push origin main
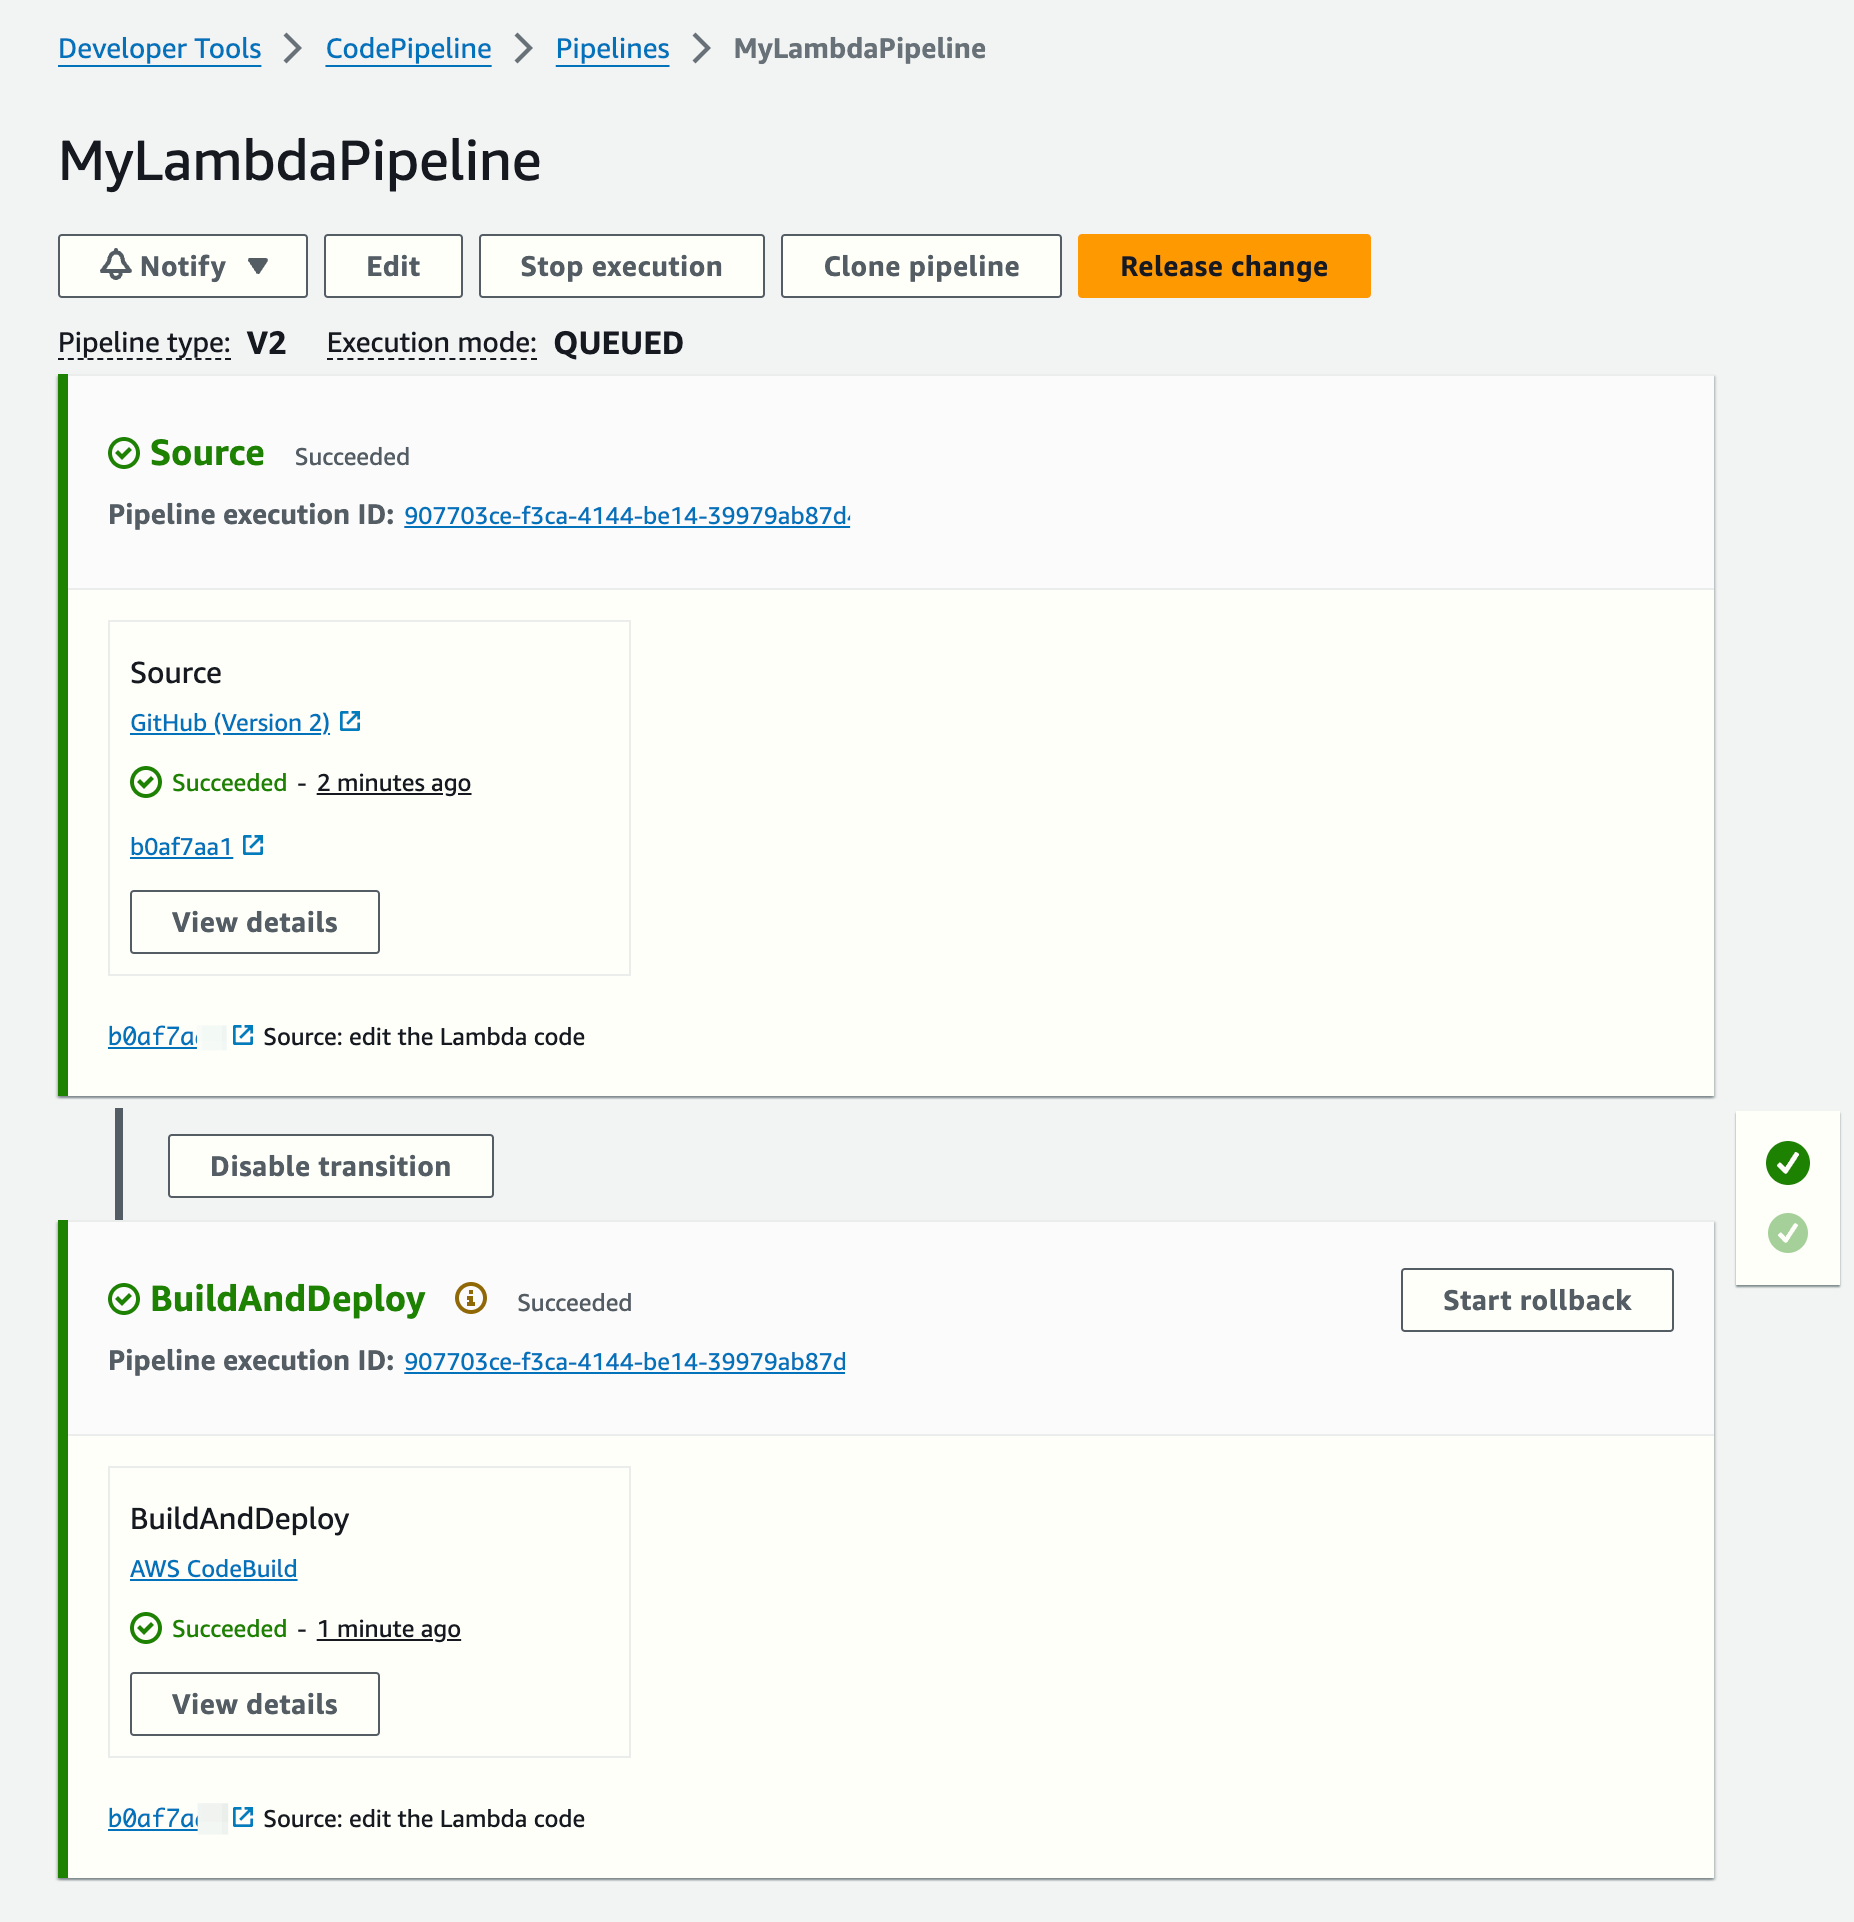
A new CodePipeline ends (the execution time was 1 minute 20 seconds):
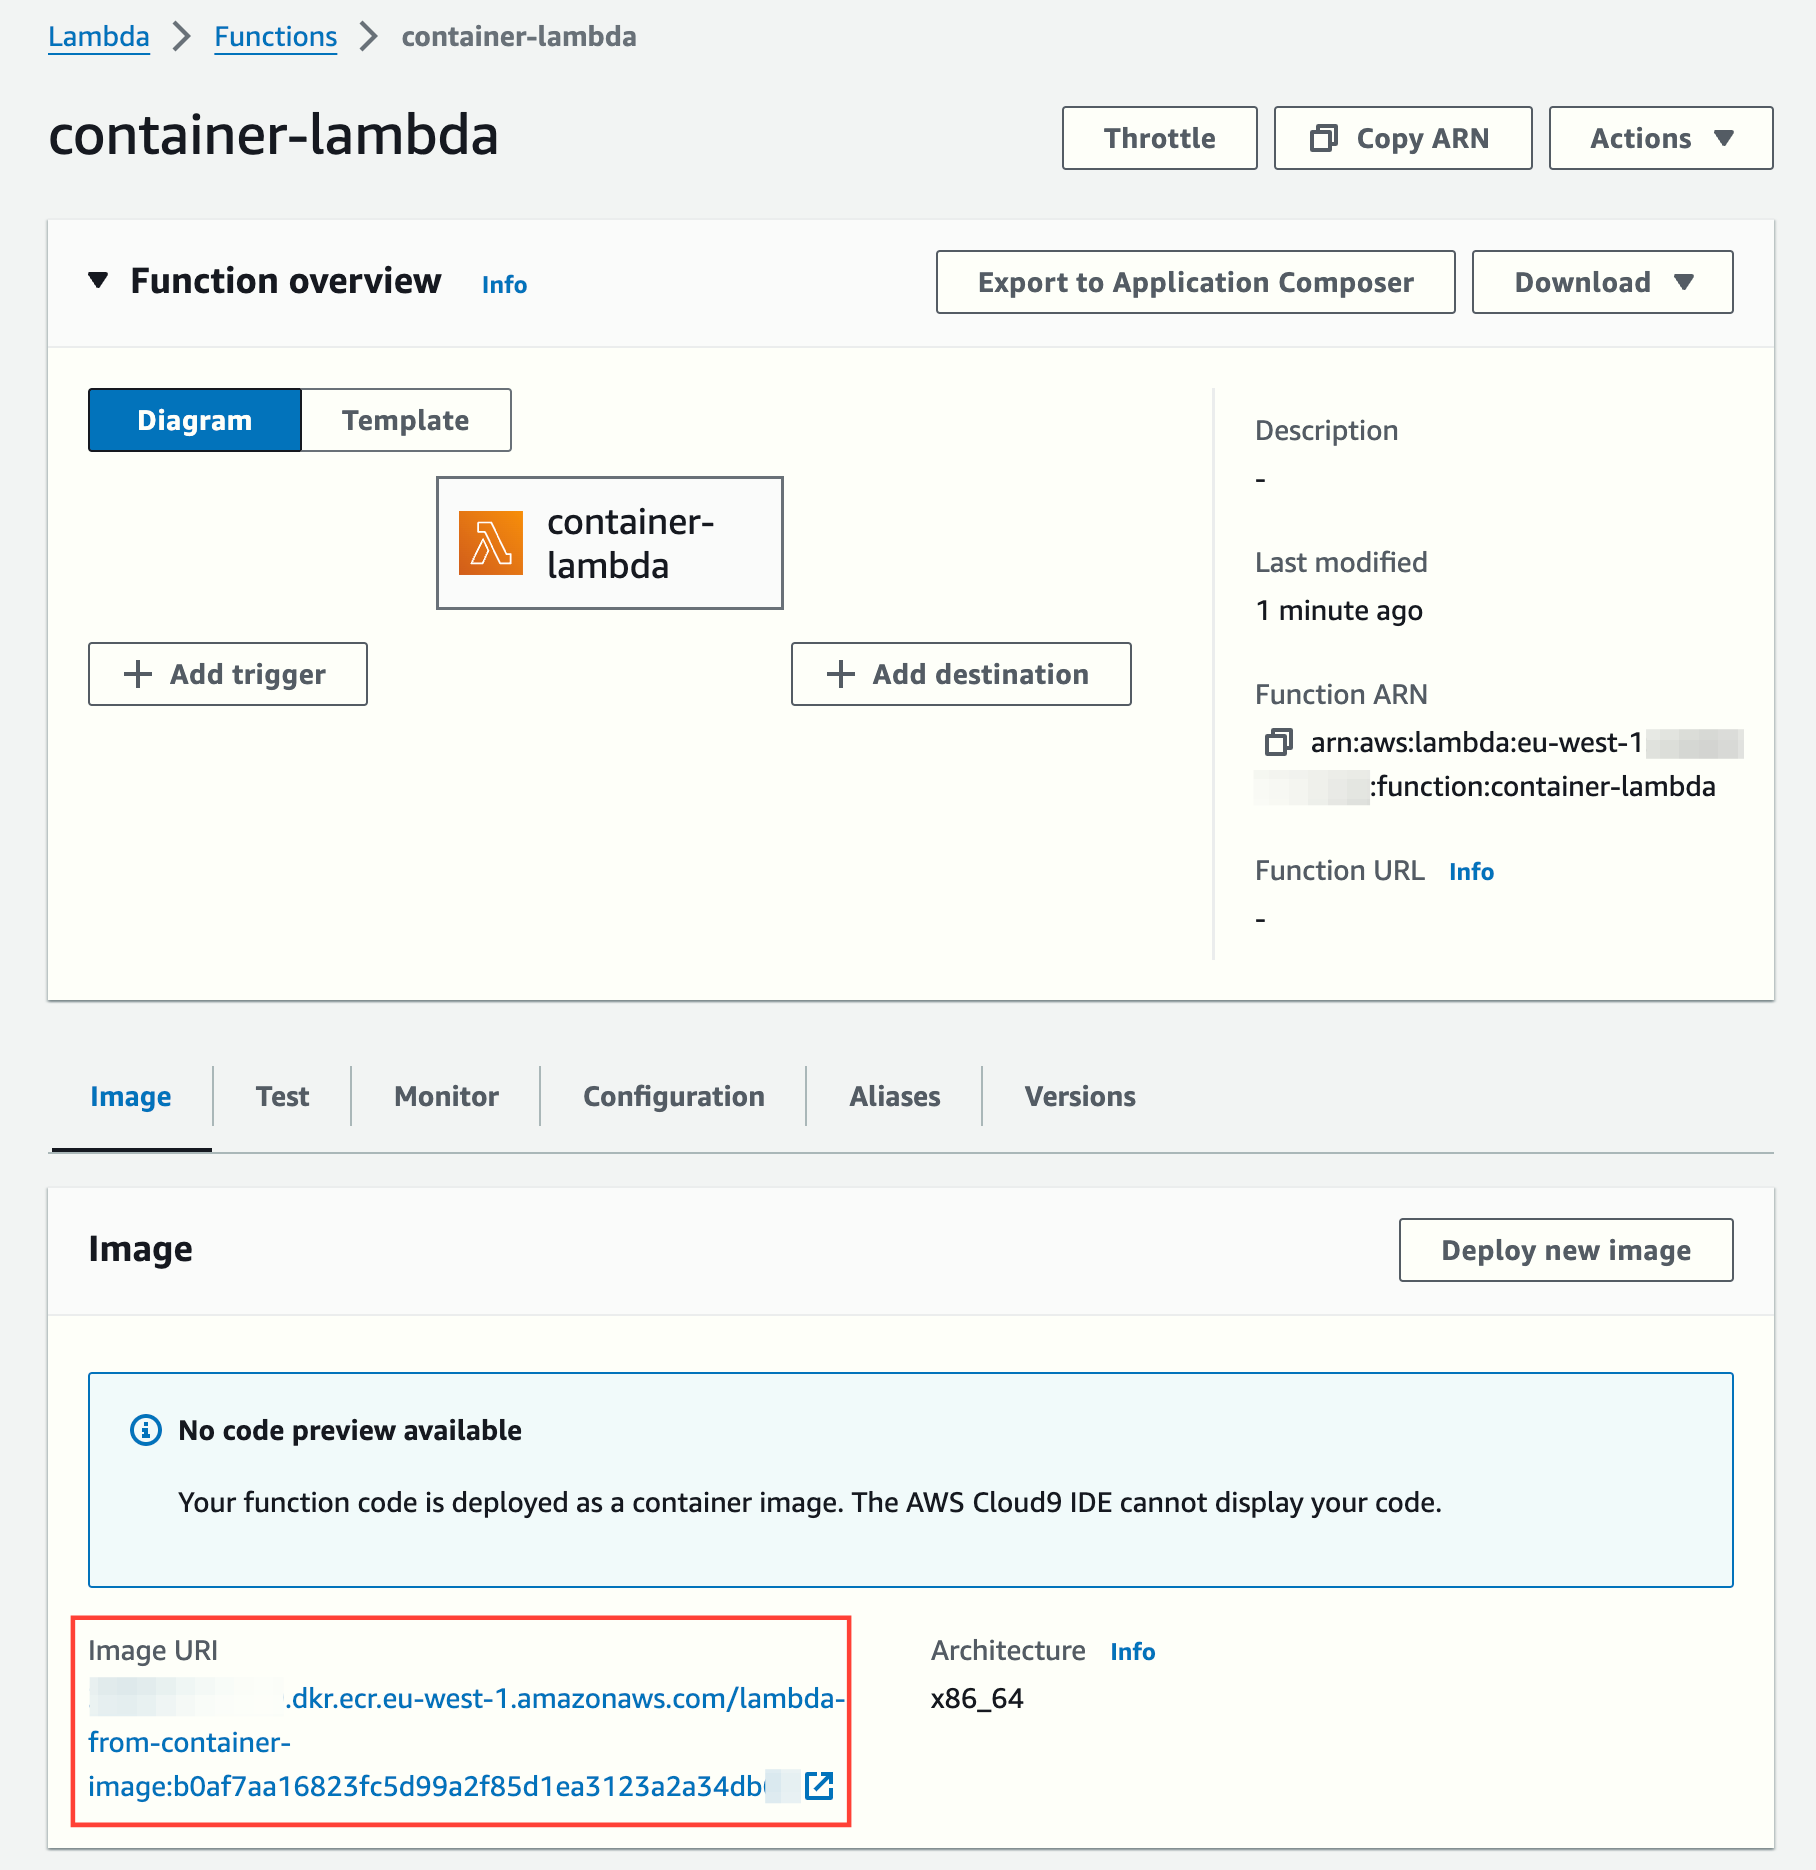
The Lambda image has changed:
Running a test shows the changes. Notice there is a cold start, as expected (later invocations take single-digit ms to execute):
(optional) Cleanup Steps
Run these commands to delete all the resources created so far:
# Delete CodeStar Connections connection
aws codestar-connections delete-connection --connection-arn $GITHUB_CONNECTION_ARN

# Delete CodePipeline
aws codepipeline delete-pipeline --name MyLambdaPipeline

# Delete CodeBuild project
aws codebuild delete-project --name MyLambdaBuildProject

# Delete the ECR repository (after deleting the images)
aws ecr batch-delete-image --repository-name lambda-from-container-image --image-ids "$(aws ecr list-images --repository-name lambda-from-container-image --query 'imageIds[*]' --output json | jq -c '.[]')"
aws ecr delete-repository --repository-name lambda-from-container-image --force

# Delete Lambda function
aws lambda delete-function --function-name container-lambda

# Force delete Lambda role (detach all managed policies and delete role)
for policy_arn in $(aws iam list-attached-role-policies --role-name lambda-execution-role --query 'AttachedPolicies[].PolicyArn' --output text); do
  aws iam detach-role-policy --role-name lambda-execution-role --policy-arn $policy_arn
done
aws iam delete-role --role-name lambda-execution-role

# Force delete CodePipeline role (delete inline policies, and delete role)
for policy_name in $(aws iam list-role-policies --role-name containerlambdacicd-codepipeline-role --query 'PolicyNames[]' --output text); do
  aws iam delete-role-policy --role-name containerlambdacicd-codepipeline-role --policy-name $policy_name
done
aws iam delete-role --role-name containerlambdacicd-codepipeline-role

# Force delete CodeBuild role (delete inline policies, and delete role)
for policy_name in $(aws iam list-role-policies --role-name containerlambdacicd-codebuild-role --query 'PolicyNames[]' --output text); do
  aws iam delete-role-policy --role-name containerlambdacicd-codebuild-role --policy-name $policy_name
done
aws iam delete-role --role-name containerlambdacicd-codebuild-role

# Delete all objects in the artifacts bucket
aws s3 rm s3://$ARTIFACTS_BUCKET_NAME --recursive

# Delete the artifacts bucket
aws s3api delete-bucket --bucket $ARTIFACTS_BUCKET_NAME
Conclusion
Using AWS CodePipeline and CodeBuild, you can automate the packaging and deployment of your Lambda code as a Docker container image. This approach simplifies dependency management and ensures a consistent environment across all stages of development and production.
Following this guide to configure the pipeline, every commit to your GitHub repository will trigger the pipeline that builds a new container image and automatically updates the Lambda function.
